WARNING: this is strictly speaking a non-car related post… it’s more about animating 3D infotainment videos.
This post has mainly been written so I can remember what, and why, I did what I did to create my Engine Cooling Animation. It will also be interesting to Blender Heads setting up a mixed OS render farm on MacOS and Ubuntu with a Synology NAS targeting Final Cut Pro… yeh… I know that’s pretty specific ¯\_(ツ)_/¯ You’ve been warned!
Well I’ve been working on an engine animation video for the past 5 years. It’s been a labour of love (and sometimes frustration) that I’m hoping to get published to YouTube in the next few weeks.
But in the creation of the video I’ve put together a rather complicated (for a one person team) workflow.
This diagram shows the workflow. I’ll go into the details of each step for your insomnia busting delight later on in this post!
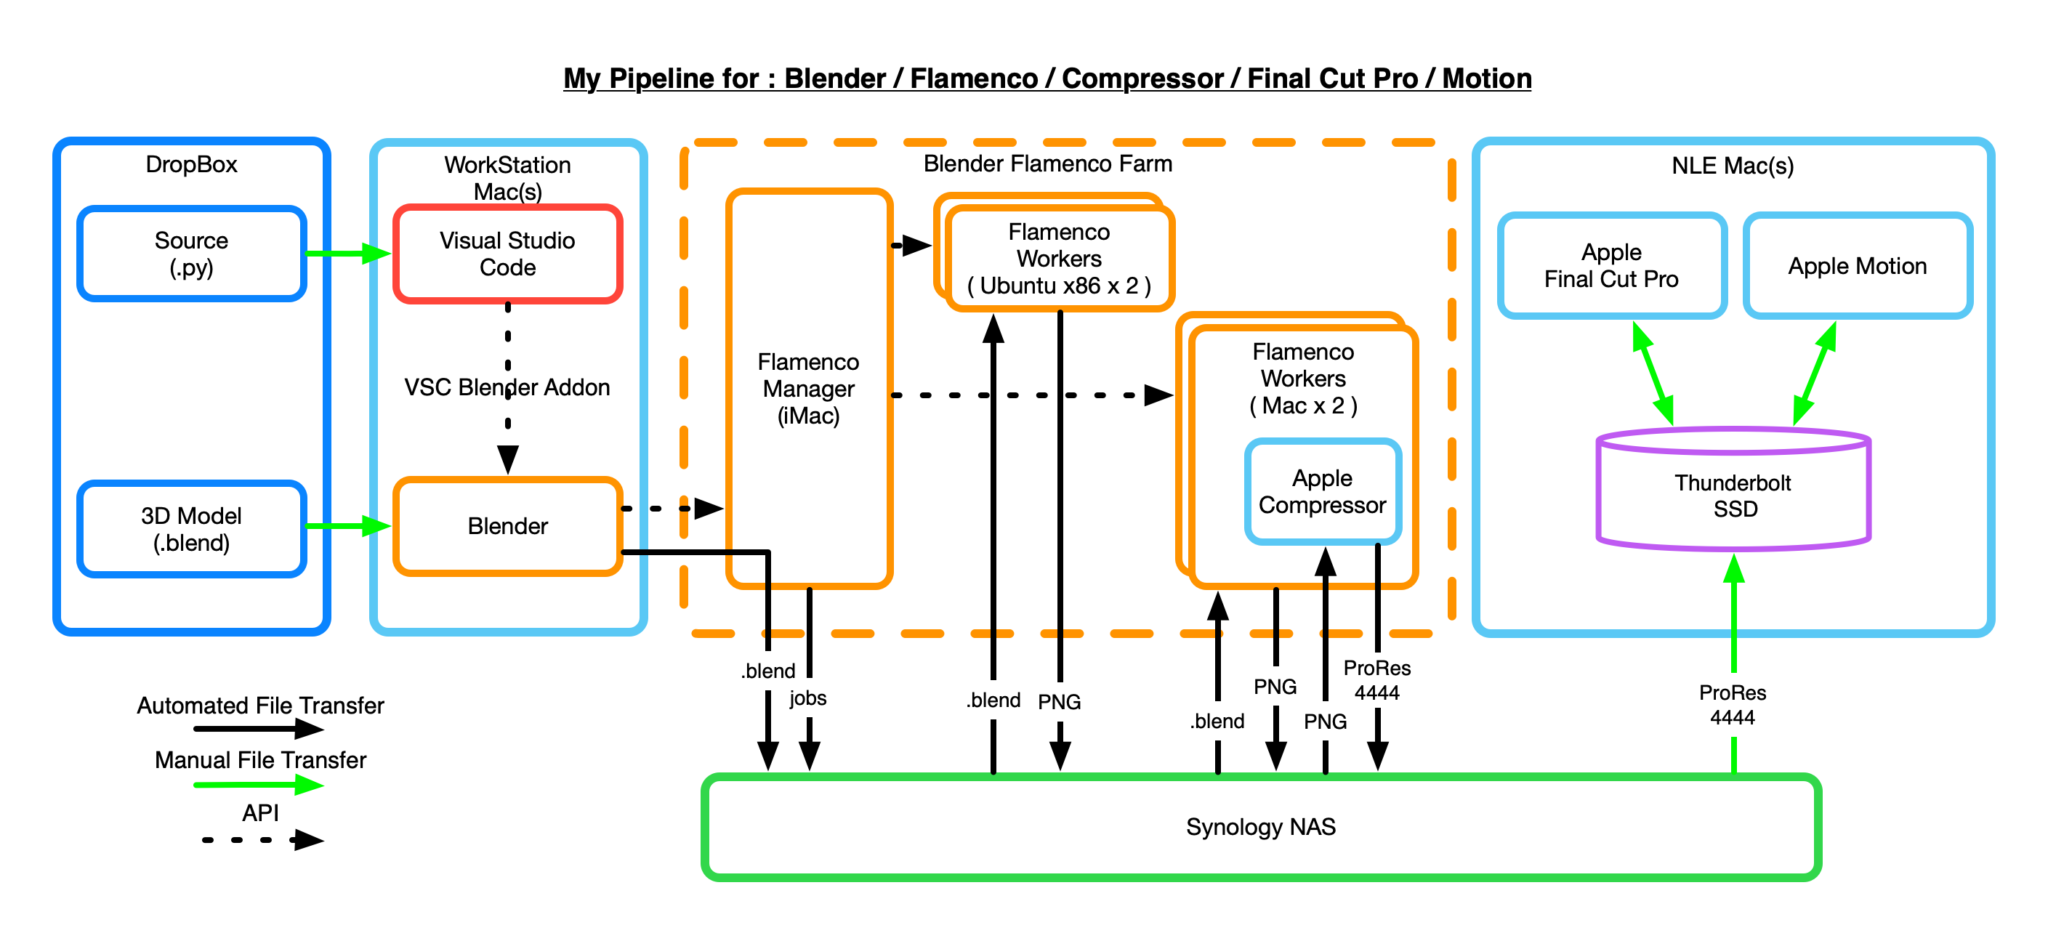
[ Note: I’m still trying to figure out exactly where the Dev Mac (Workstation) sends the blend file.]
Before I break down each of the steps, lets talk about the big picture.
The Big Picture
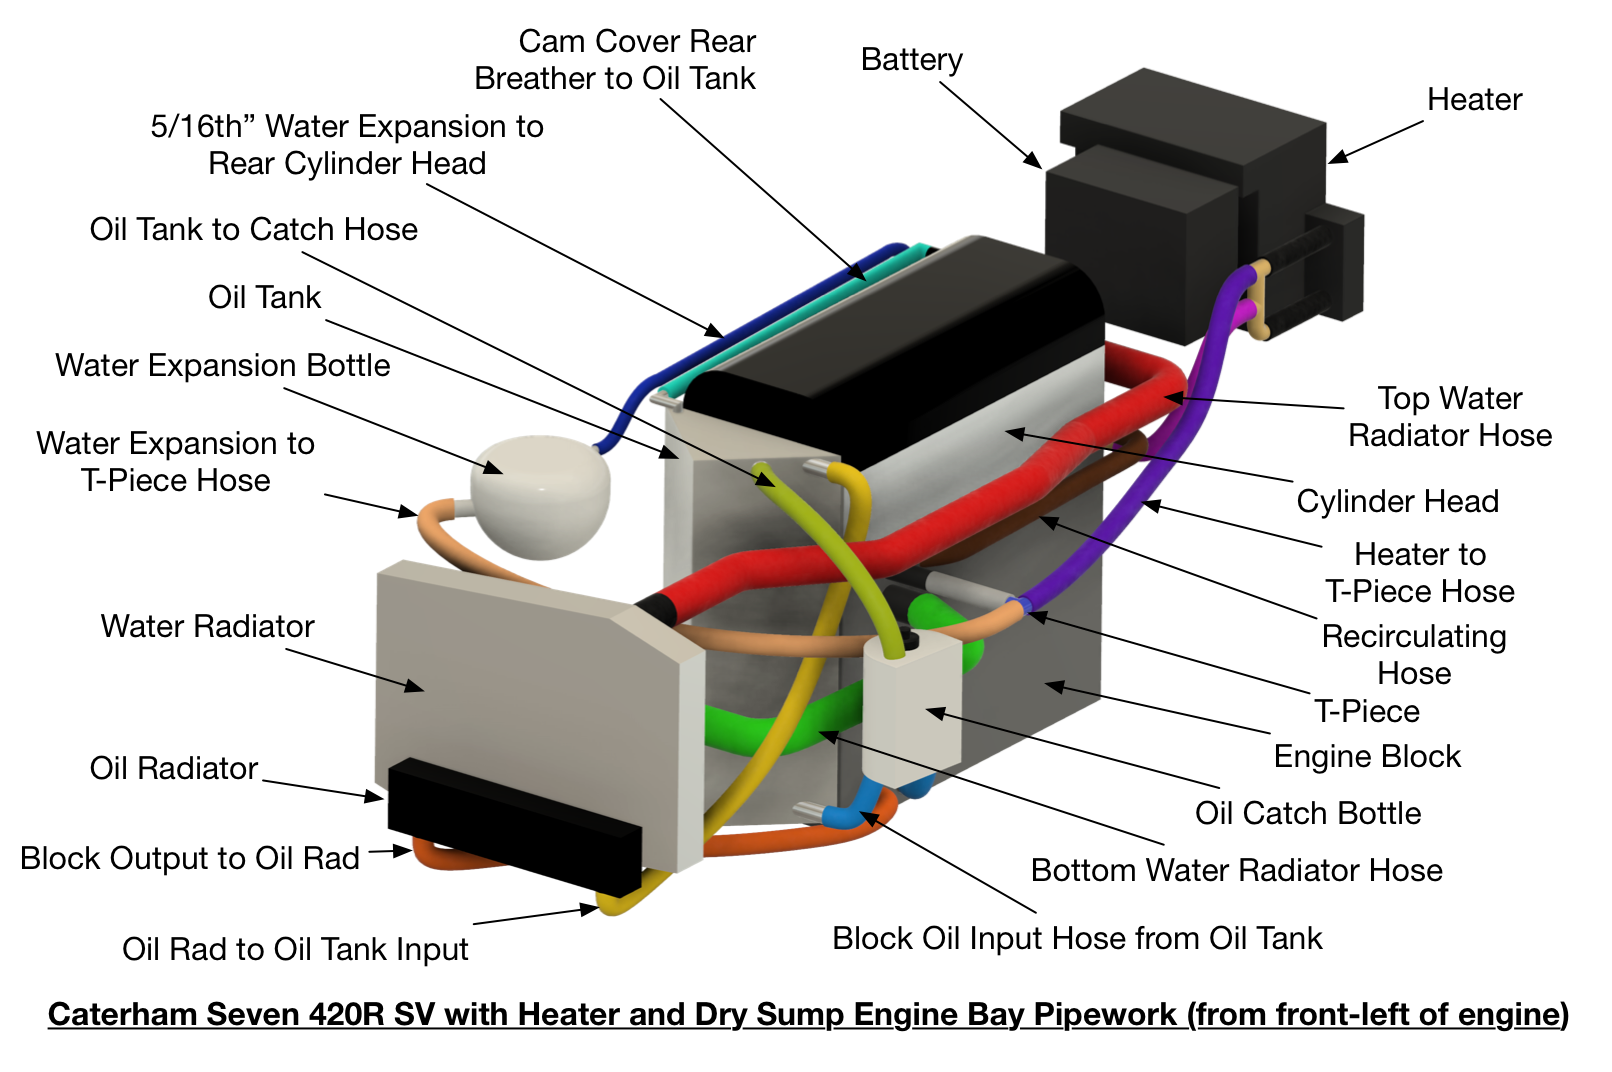
Back in 2017, for my 420R build blog, I did a more detailed blog entry about engine cooling, see 17.5 Water and Oil Overview. But people wanted more, they wanted to know how the coolant flowed around the engine bay. And the best way I could think to do that was with an animated video showing exactly that.
The animation would show the full car, the engine bay, pipework and the flow of air and coolant around the car. I also wanted to show some of the key cooling components, like the thermostat, and how they worked in the system. So not only was I going to animate the cooling, I needed to animate some components too. But that’s not all, because a car’s engine bay is a complex rats nest of plumbing, it would really help to look at the engine bay (as the coolant flowed and the components animated) from different angles… so I was going to need to animate the camera view as well.
But it has now taken 5 years and many hundreds of hours of figuring out how best to do that.
I soon landed on using Blender as the starting point… and then learnt… that my animation skills in Blender weren’t up to the job. I’ve been using Blender since before 1.79 but can only really call myself a casual user.
I also realized that I didn’t have a very detailed idea of how much I was going to say at each point in the final animation video, so I needed the timing of the animation to be controllable. This isn’t a very good way of doing animated videos, its best to have a script first, but my way of doing videos is always to play around with what can be done and then zone-in on a script as I figure things out.
Blender allows you to be very precise with key-framing, but I wanted to do something much more flexible than hand crafting key-frames will allow.
So Python was my chosen route.
Python would control the 3D model and camera – key framing everything. And, in the end, submit the animations for rendering. The renderings would be brought into my video editing app of choice (Final Cut Pro) and a final video would be cut together with a voice over.
At the time of writing I’m up at around 180,000 Python generated keyframes and 10,000 frames.
Then about half way through the 5 year marathon, Blender released (or at least I realized they’d released) one of their studio tools, Flamenco. This suite of tools allows you to create a “render farm” to speed up the Blender rendering across multiple worker machines (10,000 frames of video, each taking between 20 seconds and a minute to render – depending on the computer I use to do the rendering).
It also helped here that Apple started to officially support Blender and my Apple Mac renderings sped up significantly.
So the stars were aligning for a project that I could actually deliver on… eventually!
So lets go through the bits and pieces of the workflow…
Blender
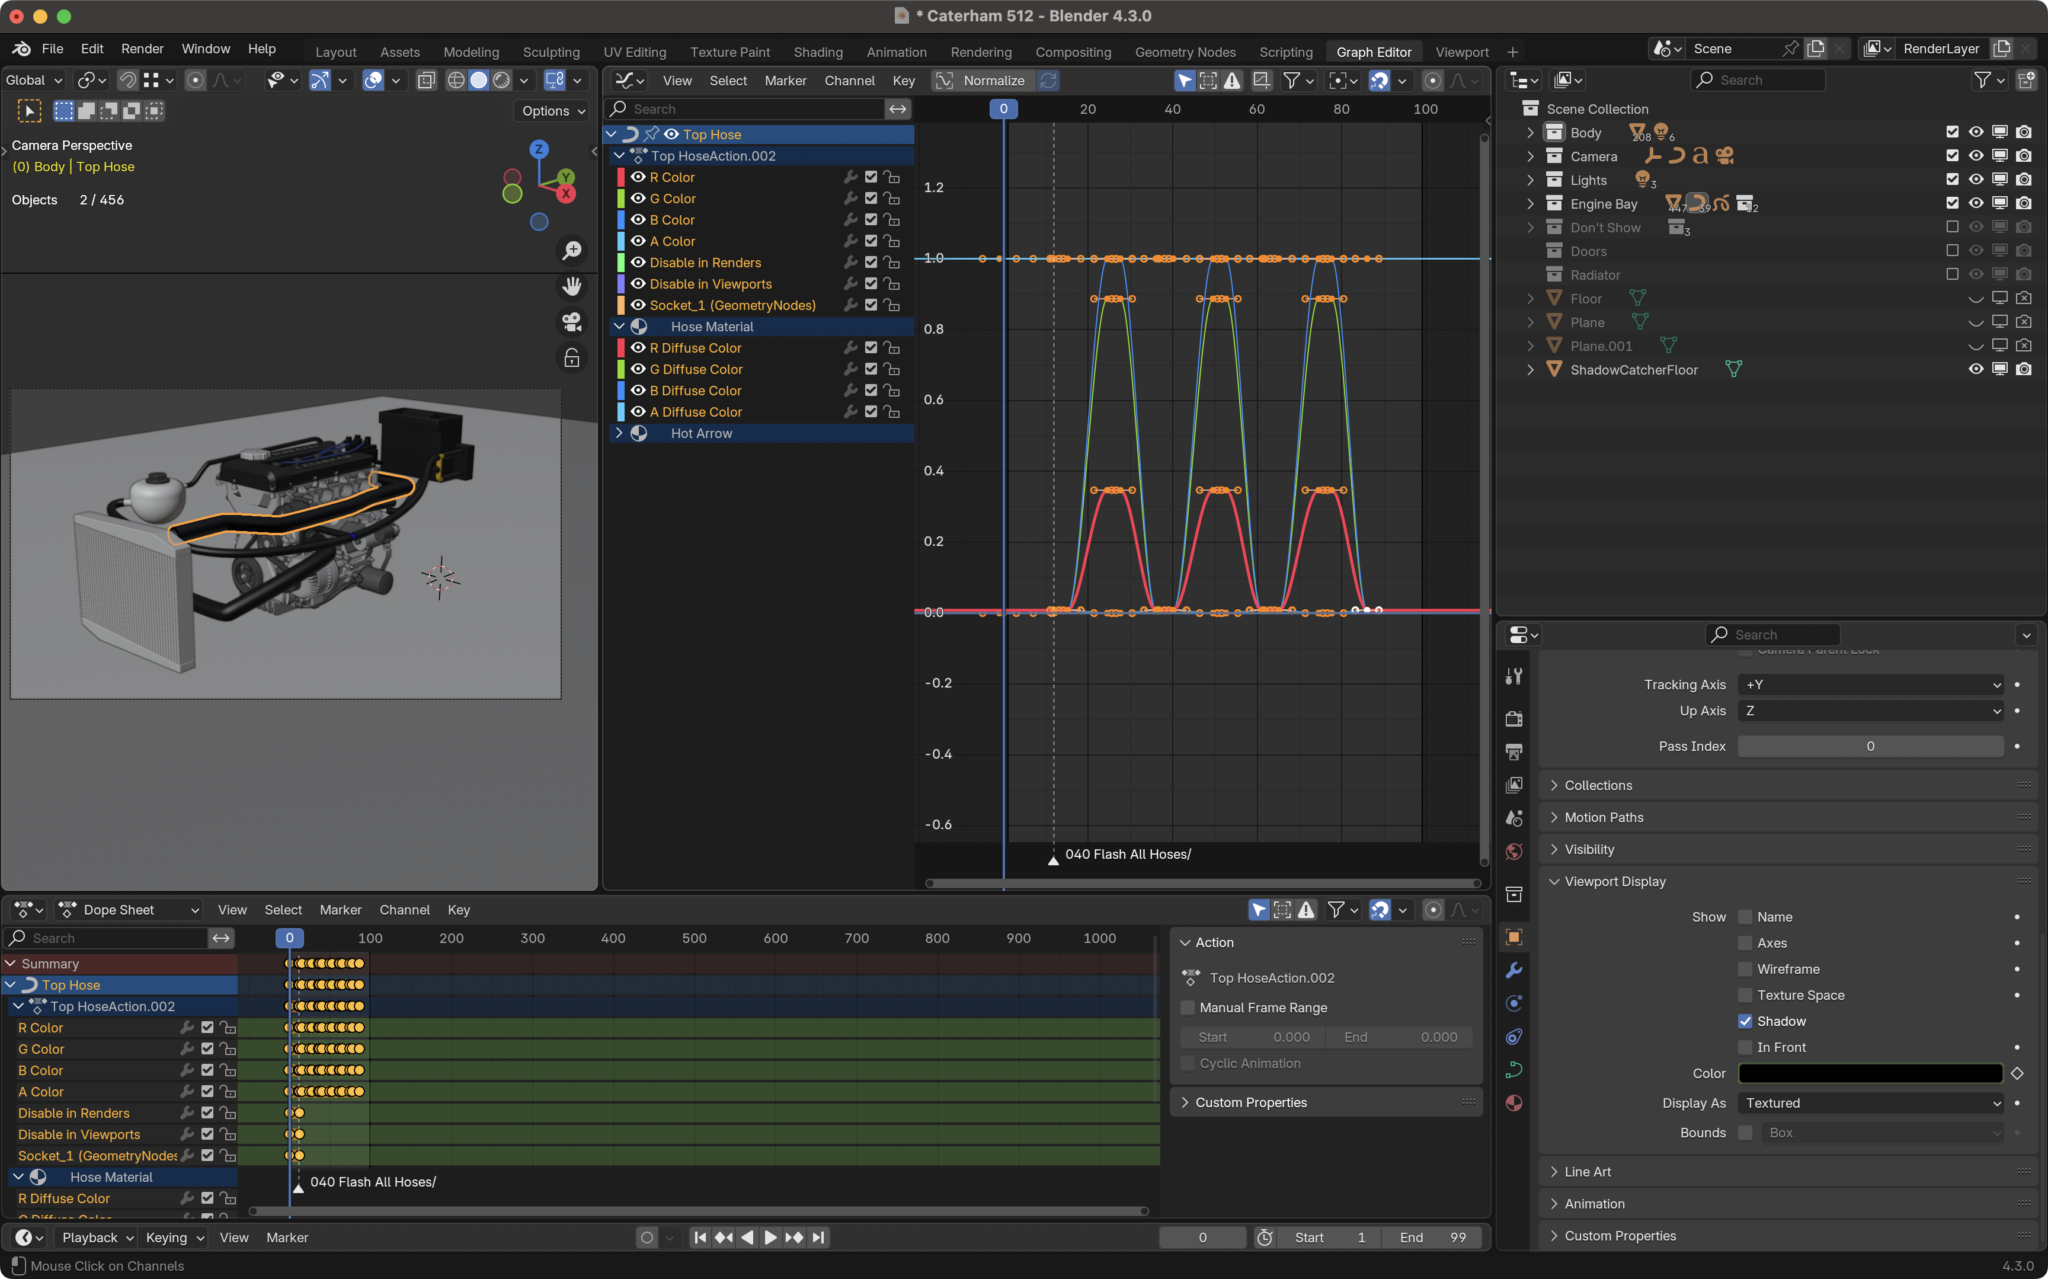
Not much to say about Blender that hasn’t been said by thousands of YouTubers. But in my Workflow I have downloaded some models (the Car, Duratec Engine), modeled some stuff myself (cooling system, battery, radiator, exhaust headers, thermostat etc) and used Geometry Nodes to create some geometry (coolant pipes and radiator) and animations (camera, coolant animation, thermostat animation, air animations).
My basic camera rig is to have a camera, camera track and empty. The camera track and empty are co-located. Then the camera tracks to the empty. The camera sits on the camera track.
Then to animate the camera
- I move the camera track and empty to the position, which is typically an object, I want to the camera to look at
- Scale the camera track (a bezier circle) so the camera frames as much of the scene as I want
- Move the z-postion of the camera track to get the right viewing angle.
This camera rig works well for the camera movements I want. Keyframing these positions and scales at the same time gives me a cool pan/zoom that as the camera rotates around the object in question will give a smooth natural camera movement.
Render Output
My preferred output from Blender was as PNG image sequences with alpha.
I need alpha because I can then composite the final video in FCP in a more nuanced way, depending on what sort of z-order I want in the final edit.
But the FFMPEG inside blender doesn’t do a very good job of creating lossless video (at least that Final Cut Pro likes) and also outputting video with alpha is a problem.
Rendering images is also a resilience play, if Blender crashes (which happens less now than it used to), you can restart the render sequence from the point just before the crash, saving all that previous render time up to the crash – crashes will trash a video file being output by Blender.
I do also regularly spit out a new blend file version – even though my Dropbox account will keep backups of my saved files, I like to control the point where I create a save-point. So, I use a three digit number at the end of each blend file, i.e. “Caterham 500.blend” to give me some sort of version control. Whenever Blender increases their application version, I increase the first digit. Then every day or two of working on the file I’ll update the second two digits using the + button feature on the Blender file save dialog box (just next to the filename being saved – that’s a really cool auto-increment feature!).
I use Flamenco to stitch the PNGs together, but more on that later.
The 3D Model
The objects in the model are set to render as well as I could manage in all the render modes (workbench, preview and render). To do this I set most of the objects to have an object -> Viewport Display -> Color. The Shader Nodes usually then pick up on this color, but almost always the alpha. The viewport and EEVEE render engines don’t really like to have objects in the scene with zero-ed alpha. They still sort of show as phantom objects. So to get rid of “invisible” objects the Python will also keyframe the object’s viewport and render visibility (so when the alpha fades to zero the object is made invisible in the viewport and render).

It’s worth pointing out that I basically have just one Blend file. All the objects are kept in one file and turned on/off depending on the animation. I did try using linking to bring in different assets, but the asset system wasn’t as good when I started the project and I struggled with being able to overide the things I wanted to. So, I put everything in the same file and accepted the 650MB file size that implied.
Future Modelling Upgrades
My way of doing alpha visibility in Blender is probably very brain dead. I should have used View/Render Layers and composited the things I wanted alpha-ed. This would have probably given me a better fade-in/out of the things I was trying to hide.
As it stands at the moment (with a single view layer) the alpha looks ghostly… showing objects and their internal construction (the alpha builds up as it passes through multiple objects).
What I really wanted was, say, the whole engine to fade out, leaving just an internal component. This would have been better achieved with view layers, rendering the engine with alpha=1 and then fading out that view-layer in the compositor. I might even try this before I release the video, but it would need me to rejig all my collections, and my animations are quite reliant on the collection hierarchy… we’ll see.
Python
I initially did all the Python animation key framing inside the Blender scripting panel, but that was tedious and not suitable for a bigger project like this.
So, I started to use Visual Studio Code.
Visual Studio Code – Python
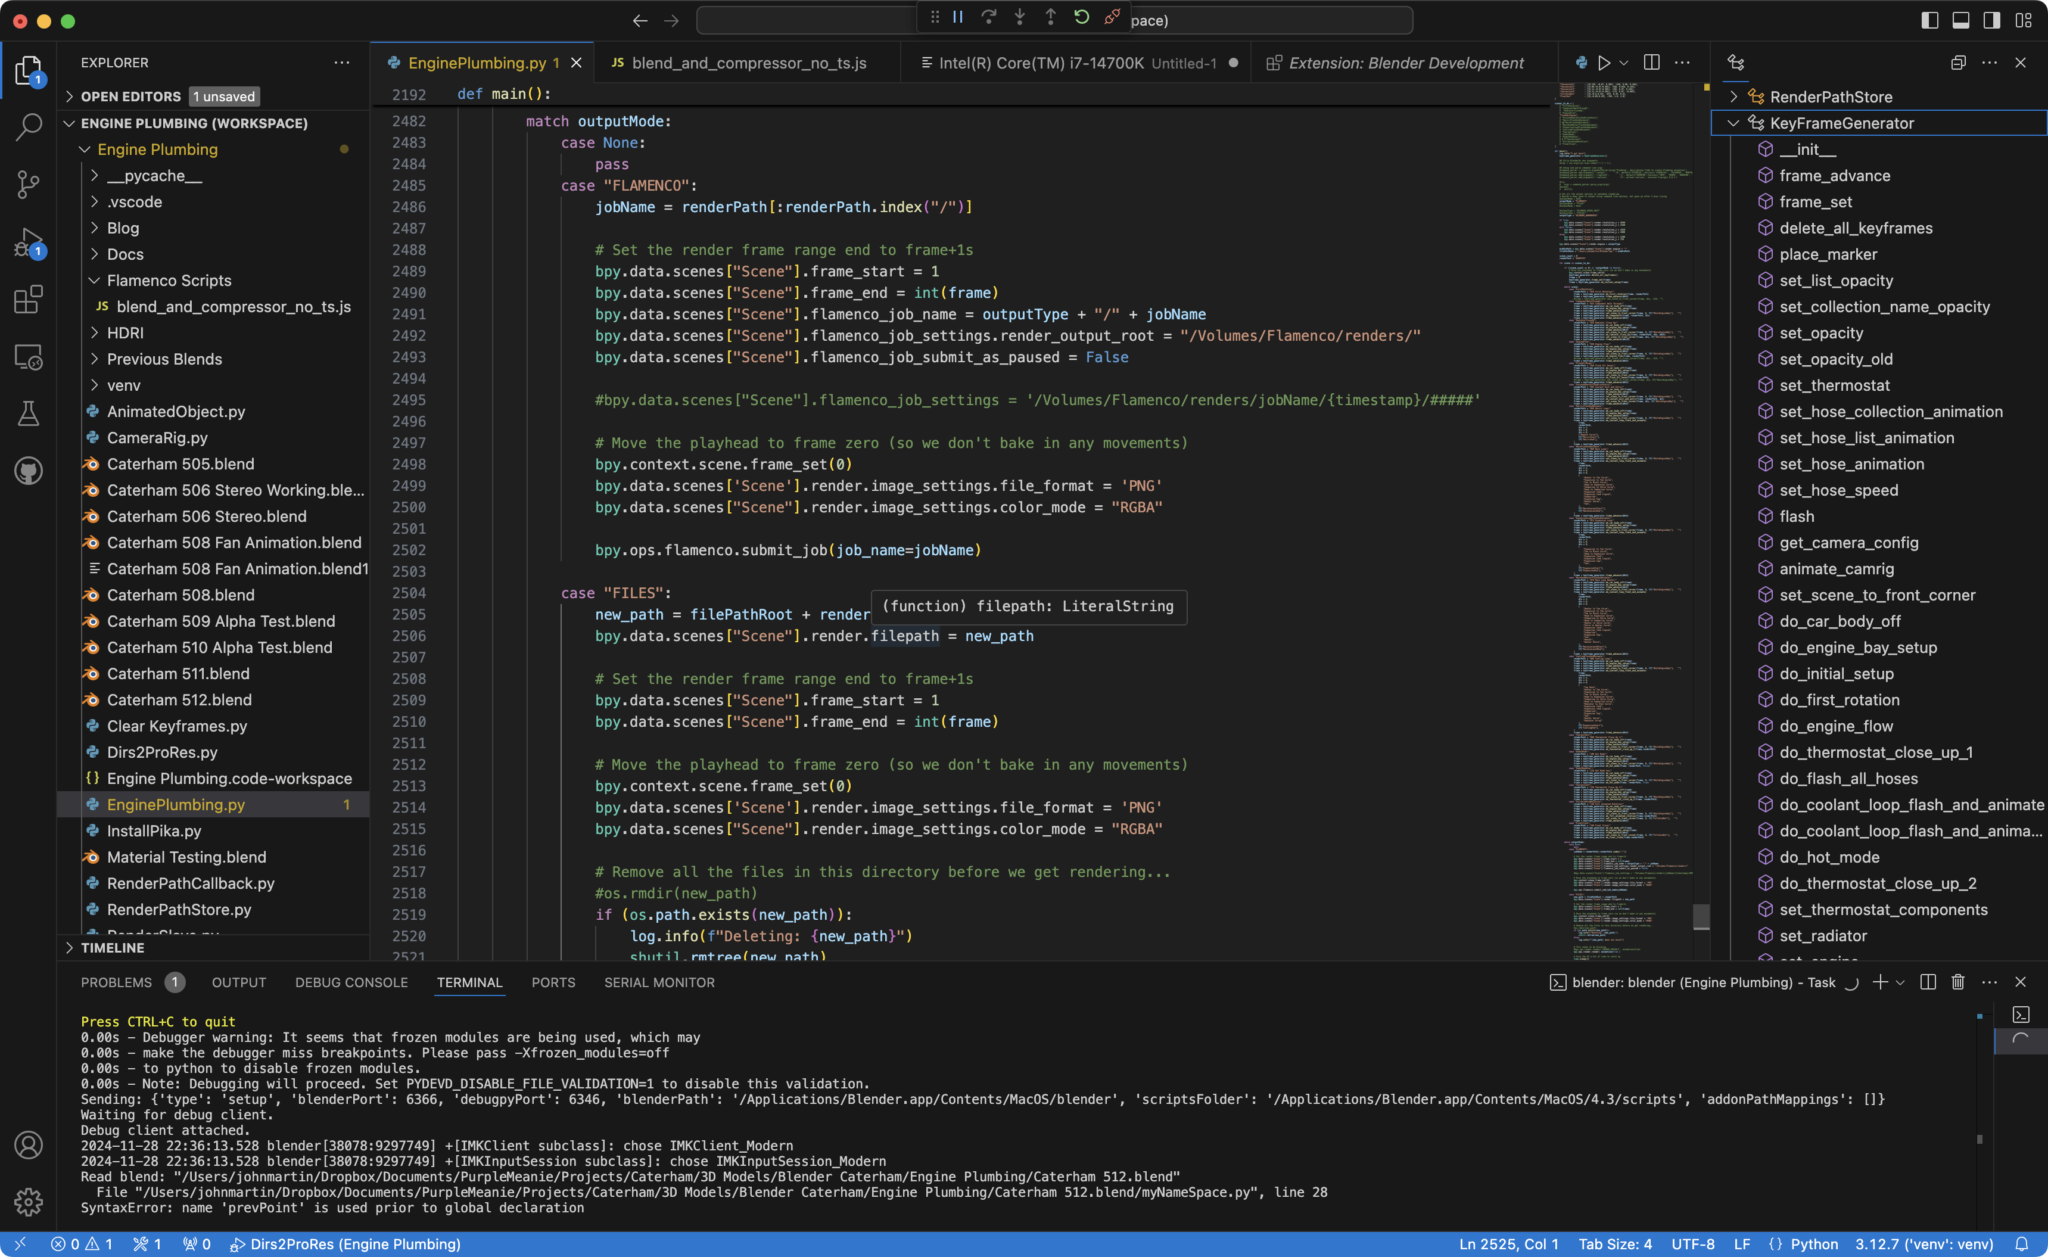
I’d been a VSC user for a number of years before this project, so I was quite familiar with how it all hung together.
But then I found the Blender Development add-on and that completely changed the way I used Python in Blender.
The Addon controls a spawned version of Blender. So, you run VSC, use it to start Blender (Shift-Command-P -> Blender: Start) and then run your Python code within that spawned instance (Shift-Command-P -> Blender: Run Script).
This is a pretty awesome Addon for Blender development and allows a fully interactive debugging session to be run within VSC. I regularly use the VSC debugger to insert breakpoints and inspect variable state while halted. It’s awesome.
So, the Python I’ve written is pretty simplistic. I didn’t get into different scenes, compositing nor the video sequence editor. The code chunks up the full animation into different stages. So there’s a chunk of code that creates a pan around a fully bodied car, one to show each of the core components, and then chunks to look at each of the cooling loops and modes… etc etc.
By chunking up the full animation I can dump out renders of the chunks without affecting the remaining chunks. So if I want to linger over a particular component or shot, then I can do that without impacting the other shots. It also means I don’t have to render out the whole project if I just change a small chunk.
Finally this approach also meant that the rendered images were numbered on a per chunk basis. It gets tricky to stitch everyone back together if your chunk image files are numbered say, 500-600 and you then add 10 more frames. The next chunk’s images now have to start from 610 rather than 600. So rendering out chunks that are numbered 1 to N for each chunk make more sense to me.
The Python code is essentially a keyframer. It adds keyframes for objects, collections and list of objects to move them around, set their visibility (alpha and viewport/render visibility) and interact with Geometry Nodes objects.
The Geometry Nodes objects are controlled by keyframing their input sockets to, for instance, enable animated arrows in the coolant pipes, start a fan/impeller rotating, or animate the thermostat opening/closing.
Here’s a screen grab of how I animate the arrows in a pipe…
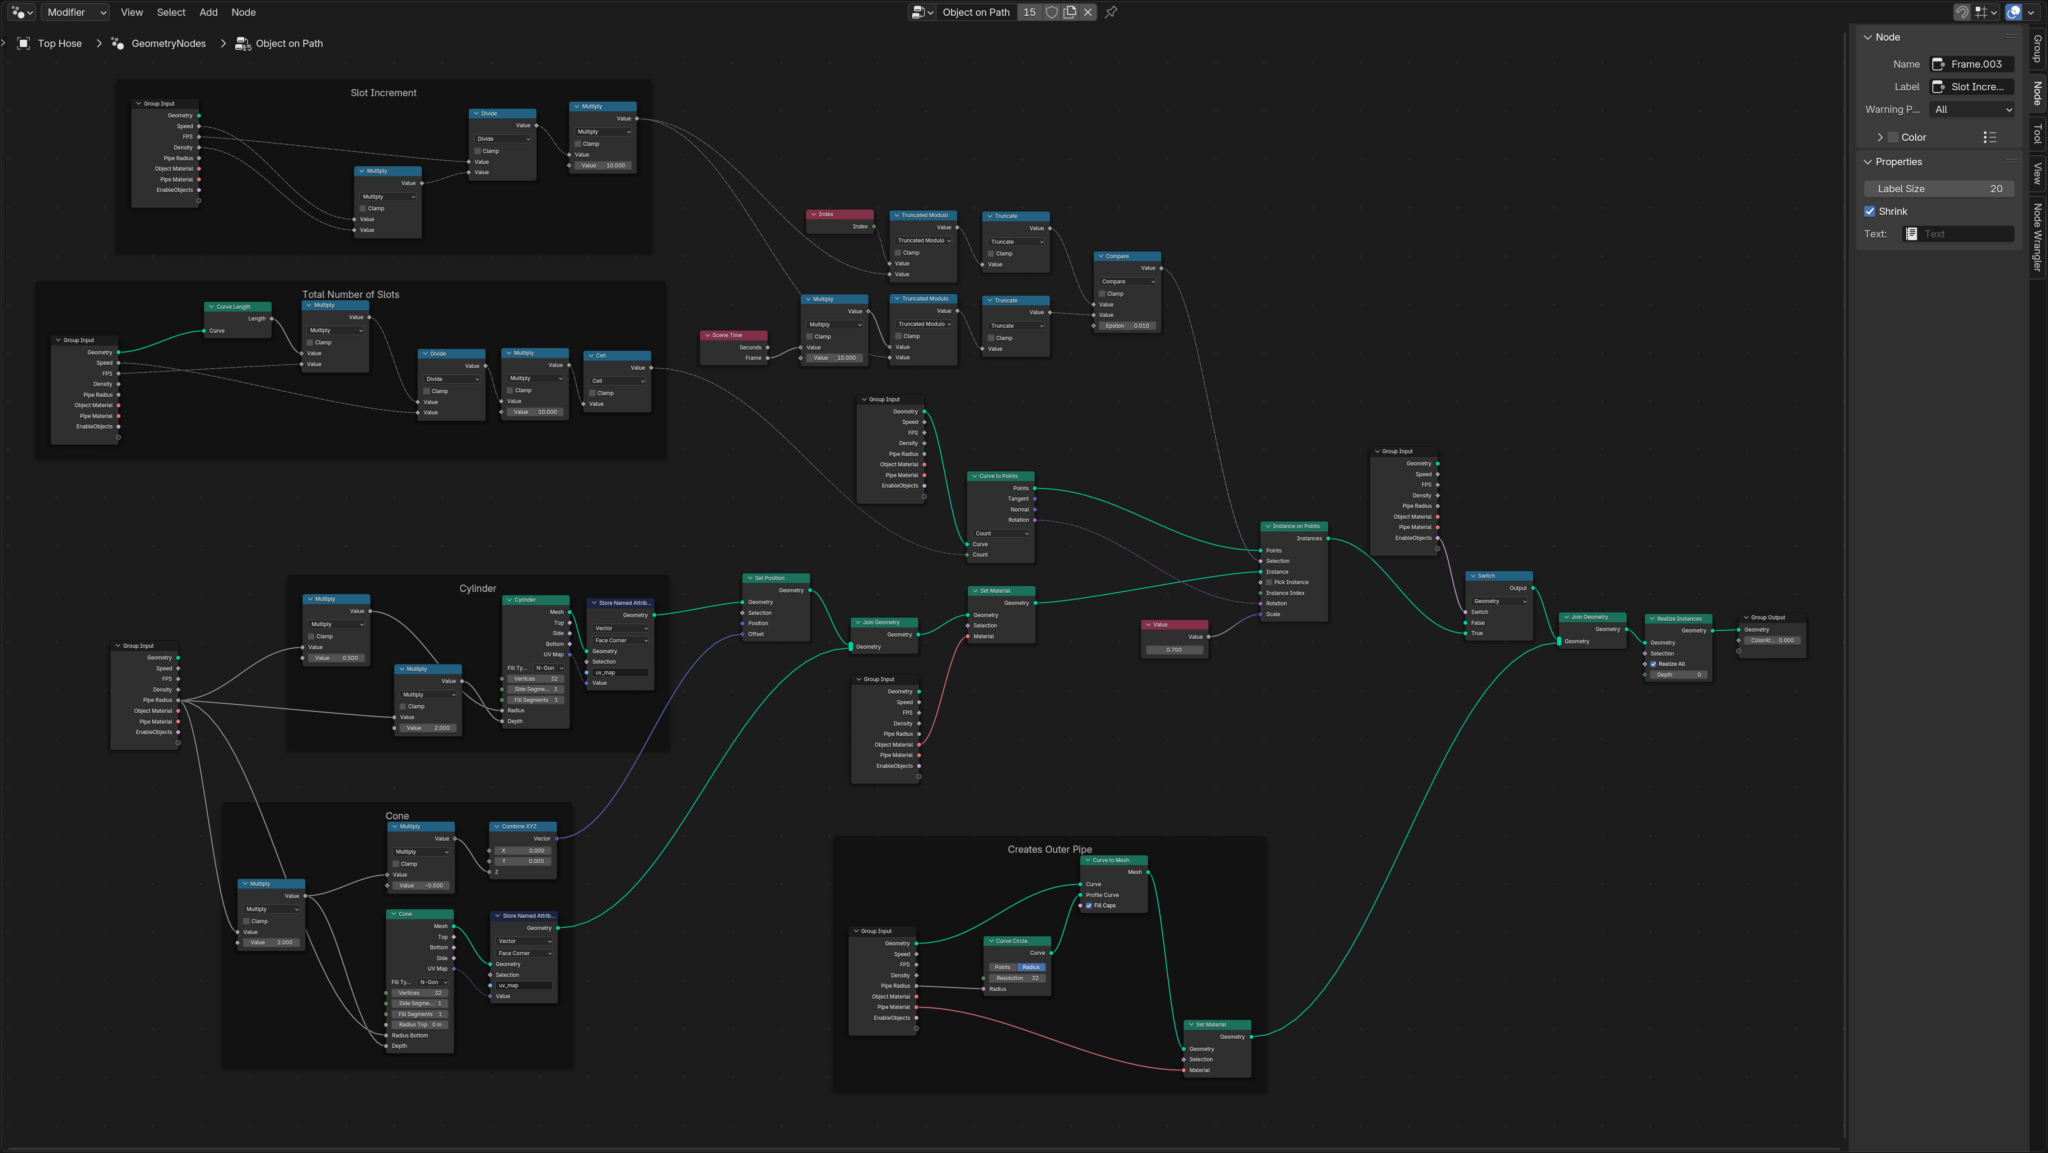
The Python is also responsible for setting up and running render jobs. I do this in three ways and with three render engines.
So I can set the code to output:
- A single non-rendered full-animation. That way I can see how different animation chunks run together. I can also manually output this setup as a single render sequence and review it – either by uploading to Apple Photos so I can see it anywhere, or just reviewing it on a local Mac.
- A locally rendered set of chunks. Each chunk is animated and then rendered to the local Blender machine. At over 6,000 frames, this can take a long time and I’ll often leave it running over night.
- Flamenco chunks. The Python can submit each chunk to a Flamenco Render Farm that I run. More on this later, but I use a custom Flamenco Job Type to set the directory structure I want and to use Apple Compressor to automatically create a lossless ProRes-4444 video of each chunk.
case "FLAMENCO":
	jobName = renderPath[:renderPath.index("/")]

	# Set the render frame range end to frame+1s
	bpy.data.scenes["Scene"].frame_start = 1
	bpy.data.scenes["Scene"].frame_end = int(frame)
	bpy.data.scenes["Scene"].flamenco_job_name = outputType + "/" + jobName
	bpy.data.scenes["Scene"].flamenco_job_settings.render_output_root = "/Volumes/Flamenco/renders/"
	bpy.data.scenes["Scene"].flamenco_job_submit_as_paused = False

	#bpy.data.scenes["Scene"].flamenco_job_settings = '/Volumes/Flamenco/renders/jobName/{timestamp}/#####'

	# Move the playhead to frame zero (so we don't bake in any movements)
	bpy.context.scene.frame_set(0)
	bpy.data.scenes['Scene'].render.image_settings.file_format = 'PNG'
	bpy.data.scenes["Scene"].render.image_settings.color_mode = "RGBA"

	bpy.ops.flamenco.submit_job(job_name=jobName)
Here’s a snapshot of how I set up a Flamenco Render from Python…
Then aswell as the different render output destinations above, I can also chose to render using:
- the Blender Workbench (super fast),
- EEVEE (the middle option) or
- Cycles (for final work in Final Cut Pro)
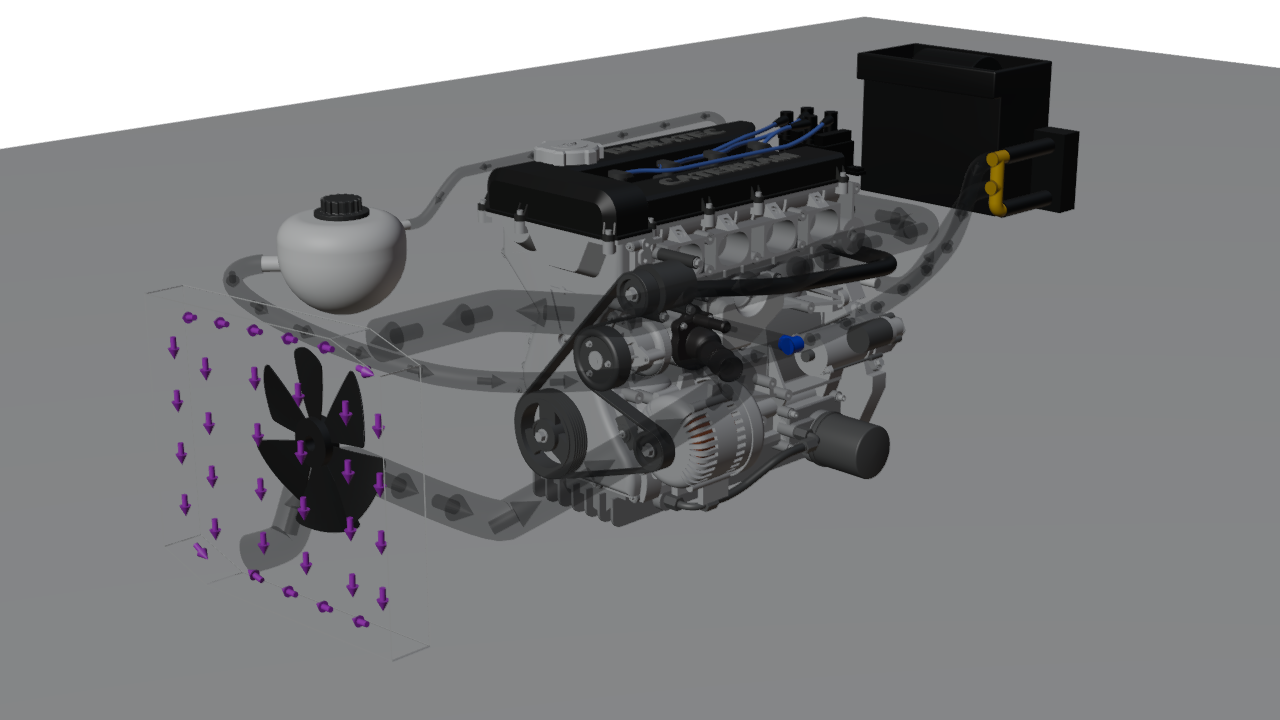
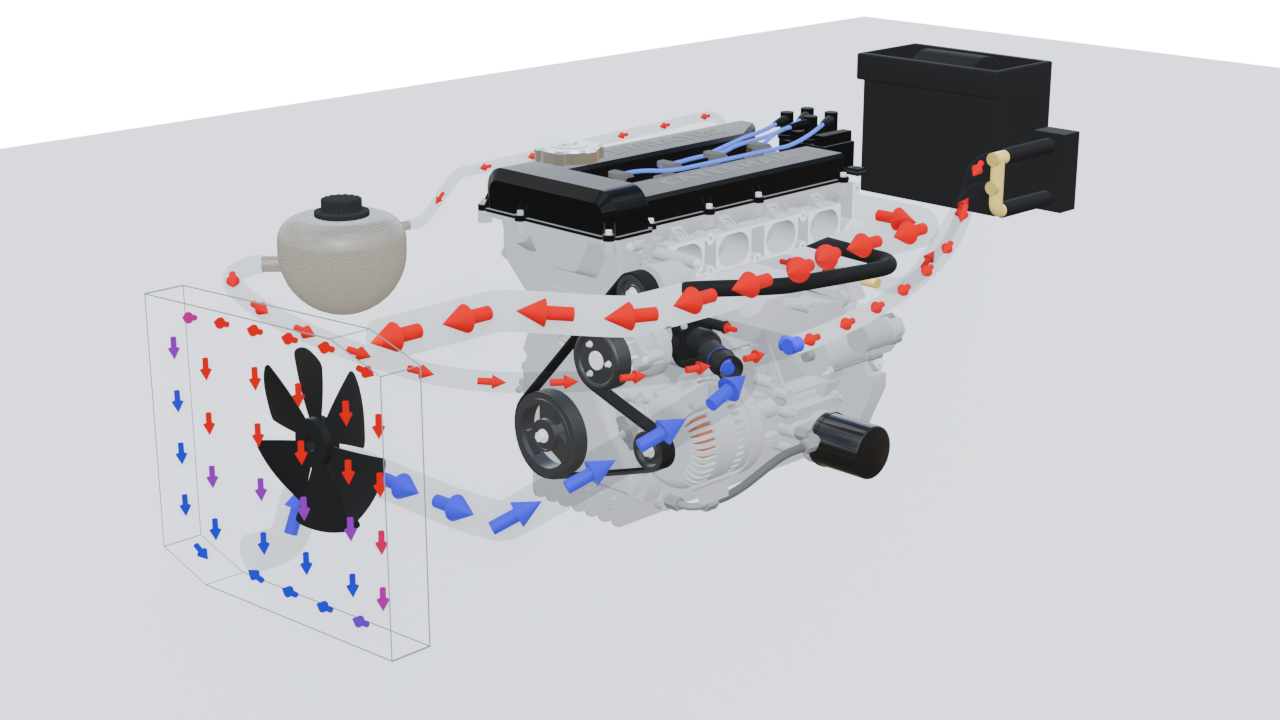
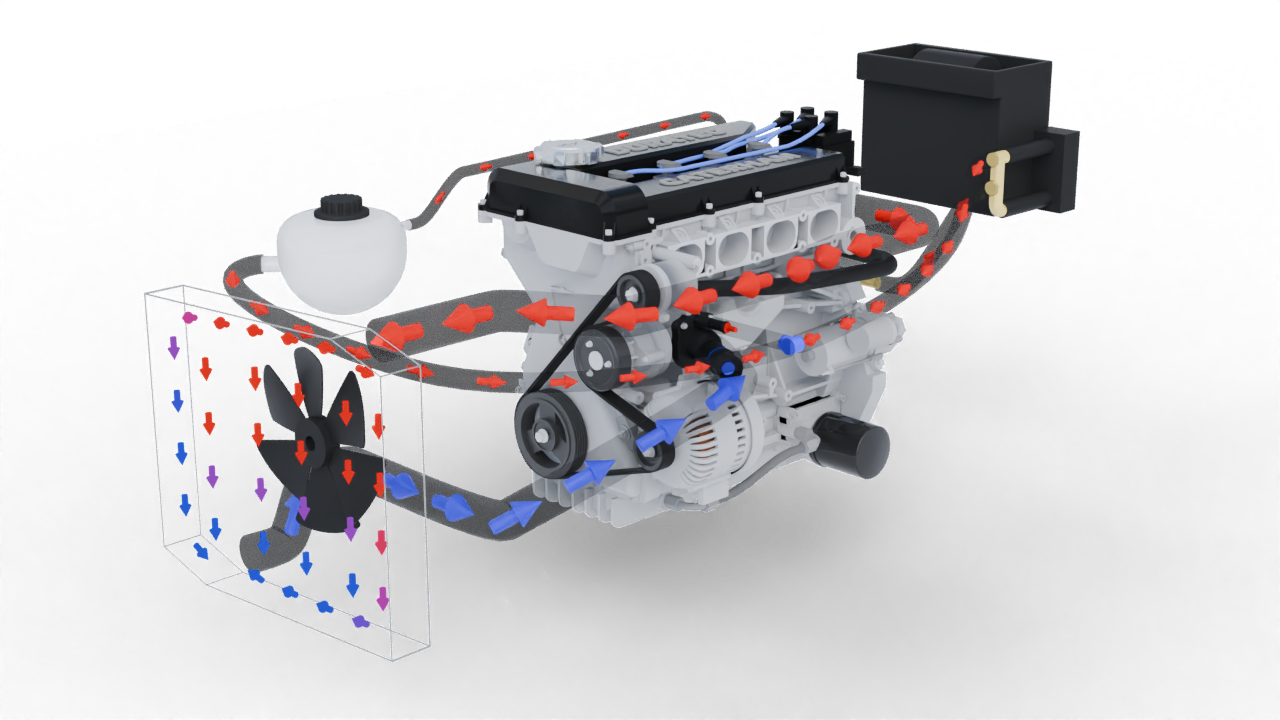
Looking at the three images above: The workbench render is pretty good as a fast and loose proxy for seeing if the animation is working. The arrows in the coolant pipes aren’t coloured, for instance, but opacity works and you can see all the animations working as they would appear in either EEVEE or Cycles.
The EEVEE render is even better. But isn’t good enough to use as a final render as well as not being so much better than the workbench that I don’t often bother doing EEVEE runs.
The Cycles render is great. But the downside is compute time. Obviously the render times will vary with the compute power available on the machine doing the render. But as a quick yardstick, if the Workbench render takes X seconds, then for this blend file (models, geo-nodes, shaders, render settings) EEVEE will take 2X and Cycles 15X. On the M1 Max laptop I’m writing this post on, that translates to 3 seconds for Workbench, 5.5 seconds for EEVEE and 41 seconds for Cycles.
NB: I know there are way better pipelines, not least of which is Blender Studio’s pipeline. But my pipeline/workflow evolved over many years.. from what I thought would be a simple 5 minute job to many hundreds of invested hours. I just didn’t want to throw all that work away and pick up a different pipeline. Once this project is done I will definitely invest some more time into looking at different (better) pipelines and workflows.
Dropbox
Dropbox is used to sync my Python source files and my source Blender file. I do typically use GitHub for source control, but didn’t bother with this project – I meant to many times, but just didn’t get around to it.
So, I mainly use one of either a Mac Book Pro M1 Max or Mac M2 Studio Ultra to do my Blender modeling and VSC coding. I save the Blend and Python files to Dropbox and once I’ve walked between the two machines the files will have synched and I can pick up where I left off on the other machine (that can’t be said of Final Cut Pro – which is still a nightmare to sync between machines… unless you use specialized video workflow management tools, that I’m not prepared to pay for at the moment).
The 650MB blend file isn’t ideal in this respect, but my internet connection seems to hold up fine to saving and syncing the file many dozens of times a day – though I am quite careful not to save the file too many times in a single minute! It would be nice if Dropbox had some sort of lazy upload option, so I could tell it to only upload this file every 5 minutes or so.
Blender Flamenco
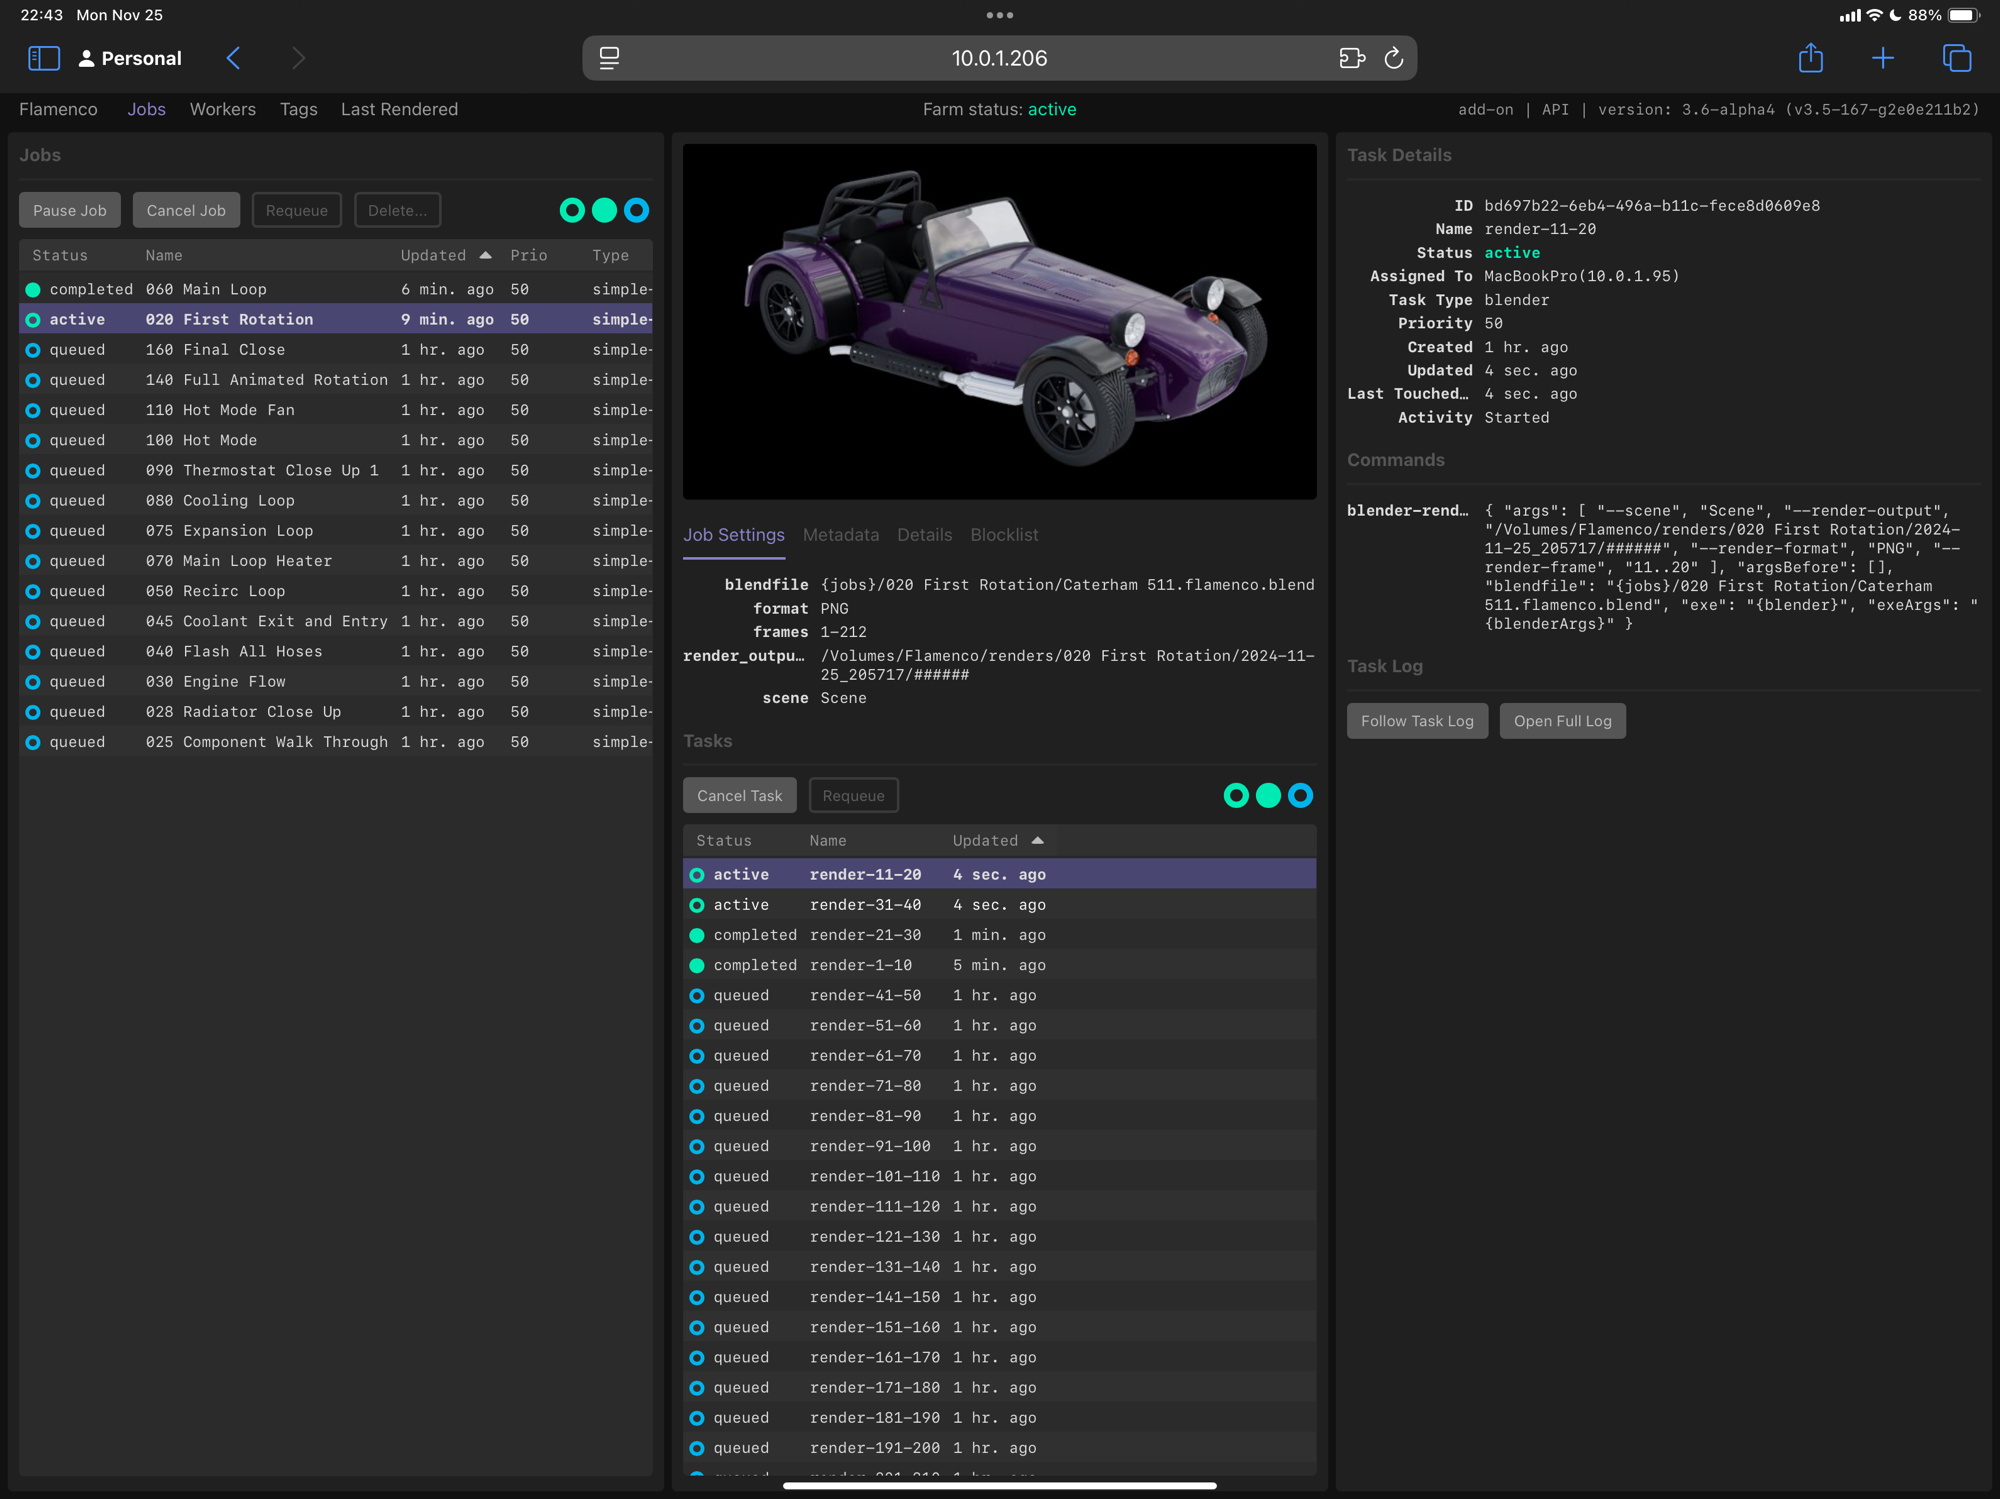
Ok. So this is just plain magic. Thank you Sybren – you’re a rock-star!!
Blender Flamenco is a Blender Studio tool that the Blender team has released – though to be fair they pretty much release everything they do, as far as I can tell.
Flamenco is a combination of Go, Python, Javascript, SQLite and probably a bunch of other stuff I’m not aware of.
A Flamenco Manager is started on a machine which then accepts render “jobs” from Blender apps. It then distributes the frames to be rendered to as many Flamenco Workers that are online and awake. When a worker starts, it will register with the manager and then be available to start render tasks.
The manager and worker scripts run from the command line of my Macs and Ubuntu machines. The workers then run headless (no UI) versions of Blender to do the rendering.
Each render job is typically (at least in my workflow) initiated from a Blender GUI. There’s a Flamenco Addon that needs to be installed on the Blender you want to send jobs from.
Here’s a quick sequence diagram of the standard Simple Blender Render job with one worker …
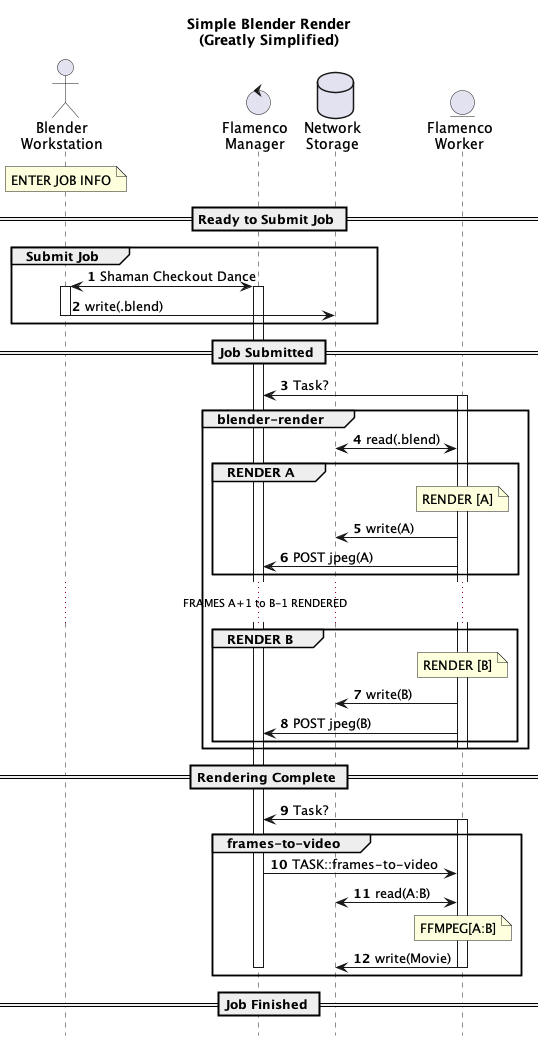
Tap the triangle/arrow for the PlantUML source of that Sequence Diagram
@startuml
title Simple Blender Render\n(Greatly Simplified)
hide footbox
autonumber
actor   "Blender\nWorkstation" as Workstation
control "Flamenco\nManager" as Manager
database "Network\nStorage" as Disk
entity "Flamenco\nWorker" as Worker1

note over Workstation : ENTER JOB INFO
== Ready to Submit Job ==
group Submit Job
Workstation <-> Manager : Shaman Checkout Dance
activate Workstation
activate Manager
Workstation -> Disk : write(.blend)
deactivate Workstation
end
== Job Submitted ==
Worker1 -> Manager : Task?
activate Worker1
group blender-render
Worker1 <-> Disk : read(.blend)
group RENDER A
note over Worker1 : RENDER [A]
Worker1 -> Disk : write(A)
Worker1 -> Manager : POST jpeg(A)
end
... FRAMES A+1 to B-1 RENDERED...
group RENDER B
note over Worker1 : RENDER [B]
Worker1 -> Disk : write(B)
Worker1 -> Manager : POST jpeg(B)
end
deactivate Worker1
end
== Rendering Complete ==
Worker1 -> Manager : Task?
group frames-to-video
activate Worker1
Manager -> Worker1 : TASK::frames-to-video
Worker1 <-> Disk : read(A:B)
note over Worker1 : FFMPEG[A:B]
Worker1 -> Disk : write(Movie)
deactivate Worker1
deactivate Manager
end
== Job Finished ==


@enduml
A more complete version of the Sequence Diagram can be seen here (after Sniffing the Glue That Holds The Internet Together (Wireshark) I think I’ve got this about right. Still not sure what’s going on at step 5, and therefore still not totally sure about who saves what to disc).
Custom Flamenco JOB Script
I’ve made a custom Flamenco job type based on the Simple Blender Render script.
My script just simply names the render files how I want and then does a (probably) rather unique step of using Apple Compressor to take the rendered PNG image sequence and create a lossless ProRes-4444 movie.
So, in the spirit of Blender’s open-source sharing is caring, here’s the current version of the Flamenco job script I’ve created. Hopefully it’ll inspire you to create your own?
// SPDX-License-Identifier: GPL-3.0-or-later

const JOB_TYPE = {
    label: "Blender Render with Compressor",
    description: "Render a sequence of frames, and create a preview video file using compressor",
    settings: [
        // Settings for artists to determine:
        { key: "frames", type: "string", required: true,
          eval: "f'{C.scene.frame_start}-{C.scene.frame_end}'",
          evalInfo: {
            showLinkButton: true,
            description: "Scene frame range",
          },
          description: "Frame range to render. Examples: '47', '1-30', '3, 5-10, 47-327'" },
        { key: "chunk_size", type: "int32", default: 1, description: "Number of frames to render in one Blender render task",
          visible: "submission" },

        // render_output_root + add_path_components determine the value of render_output_path.
        { key: "render_output_root", type: "string", subtype: "dir_path", required: true, visible: "submission",
          description: "Base directory of where render output is stored. Will have some job-specific parts appended to it"},
        { key: "composer_config", type: "string", subtype: "file_path", default: "/Volumes/Flamenco/BlenderProRes4444.compressorsetting", required: true, visible: "submission",
            description: "Location of Composer job configuration (settingspath). Needs to be visible by workers with misc actions enabled (i.e. Macs)"},
        { key: "add_path_components", type: "int32", required: true, default: 0, propargs: {min: 0, max: 32}, visible: "submission",
          description: "Number of path components of the current blend file to use in the render output path"},
        { key: "render_output_path", type: "string", subtype: "file_path", editable: false,
            eval: "str(Path(abspath(settings.render_output_root), last_n_dir_parts(settings.add_path_components), jobname, '{timestamp}', '######'))",
            // eval: "str(Path(abspath(settings.render_output_root), last_n_dir_parts(settings.add_path_components), jobname, '######'))",
            description: "Final file path of where render output will be saved"},

        // Automatically evaluated settings:
        { key: "blendfile", type: "string", required: true, description: "Path of the Blend file to render", visible: "web" },
        { key: "fps", type: "float", eval: "C.scene.render.fps / C.scene.render.fps_base", visible: "hidden" },
        { key: "format", type: "string", required: true, eval: "C.scene.render.image_settings.file_format", visible: "web" },
        { key: "image_file_extension", type: "string", required: true, eval: "C.scene.render.file_extension", visible: "hidden",
          description: "File extension used when rendering images" },
        { key: "has_previews", type: "bool", required: false, eval: "C.scene.render.image_settings.use_preview", visible: "hidden",
          description: "Whether Blender will render preview images."},
        { key: "scene", type: "string", required: true, eval: "C.scene.name", visible: "web",
          description: "Name of the scene to render."},
    ]
};


// Set of scene.render.image_settings.file_format values that produce
// files which FFmpeg is known not to handle as input.
const ffmpegIncompatibleImageFormats = new Set([
    "EXR",
    "MULTILAYER", // Old CLI-style format indicators
    "OPEN_EXR",
    "OPEN_EXR_MULTILAYER", // DNA values for these formats.
]);

// File formats that would cause rendering to video.
// This is not supported by this job type.
const videoFormats = ['FFMPEG', 'AVI_RAW', 'AVI_JPEG'];

function compileJob(job) {
    print("Blender Render job submitted");
    print("job: ", job);

    const settings = job.settings;
    if (videoFormats.indexOf(settings.format) >= 0) {
        throw `This job type only renders images, and not "${settings.format}"`;
    }

    const renderOutput = renderOutputPath(job);

    // Make sure that when the job is investigated later, it shows the
    // actually-used render output:
    settings.render_output_path = renderOutput;

    const renderDir = path.dirname(renderOutput);
    const renderTasks = authorRenderTasks(settings, renderDir, renderOutput);
    const videoTask = authorCreateVideoTask(job.name, settings, renderDir);

    for (const rt of renderTasks) {
        job.addTask(rt);
    }
    if (videoTask) {
        // If there is a video task, all other tasks have to be done first.
        for (const rt of renderTasks) {
            videoTask.addDependency(rt);
        }
        job.addTask(videoTask);
    }
}

// Do field replacement on the render output path.
function renderOutputPath(job) {
    let path = job.settings.render_output_path;
    if (!path) {
        throw "no render_output_path setting!";
    }
    return path.replace(/{([^}]+)}/g, (match, group0) => {
        switch (group0) {
        case "timestamp":
            return formatTimestampLocal(job.created);
        default:
            return match;
        }
    });
}

function authorRenderTasks(settings, renderDir, renderOutput) {
    print("authorRenderTasks(", renderDir, renderOutput, ")");
    let renderTasks = [];
    let chunks = frameChunker(settings.frames, settings.chunk_size);

    let baseArgs = [];
    if (settings.scene) {
      baseArgs = baseArgs.concat(["--scene", settings.scene]);
    }

    for (let chunk of chunks) {
        const task = author.Task(`render-${chunk}`, "blender");
        const command = author.Command("blender-render", {
            exe: "{blender}",
            exeArgs: "{blenderArgs}",
            argsBefore: [],
            blendfile: settings.blendfile,
            args: baseArgs.concat([
                "--render-output", path.join(renderDir, path.basename(renderOutput)),
                "--render-format", settings.format,
                "--render-frame", chunk.replaceAll("-", ".."), // Convert to Blender frame range notation.
            ])
        });
        task.addCommand(command);
        renderTasks.push(task);
    }
    return renderTasks;
}

function authorCreateVideoTask(full_jobname, settings, renderDir) {
    const needsPreviews = ffmpegIncompatibleImageFormats.has(settings.format);
    if (needsPreviews && !settings.has_previews) {
        print("Not authoring video task, FFmpeg-incompatible render output")
        return;
    }
    if (!settings.fps) {
        print("Not authoring video task, no FPS known:", settings);
        return;
    }

    var frames = `${settings.frames}`;
    if (frames.search(',') != -1) {
        // Get the first and last frame from the list
        const chunks = frameChunker(settings.frames, 1);
        const firstFrame = chunks[0];
        const lastFrame = chunks.slice(-1)[0];
        frames = `${firstFrame}-${lastFrame}`;
    }

    const job_name_dirs_array = full_jobname.split("/");
    let job_name_dirs = "";
    for (let i = 0; i < job_name_dirs_array.length - 1 ; i++) {  // Get all the dirs which will be the ones before the final job name
        job_name_dirs += job_name_dirs_array[i];
        if ( i < job_name_dirs_array.length) {
            job_name_dirs += "/";
        }
    }
    const final_name = (full_jobname).replace('/', '_');
    const outfile = path.join(settings.render_output_root, job_name_dirs, `${final_name}.mv4`);
    const jobpath = path.join('file://', renderDir);  // Compressor command line JobPath has to start with file:// for some reason

    print(`FullJobName: ${full_jobname}`);
    print(`JobNameDirs: ${job_name_dirs}`);
    print(`Outfile: ${outfile}`);
    print(`JobName: ${final_name}`);
    print(`JobPath: ${jobpath}`);

    const task = author.Task('final-video', 'compressor');
    const command = author.Command("exec", {
        exe: "/Applications/Compressor.app/Contents/MacOS/Compressor",
        args: [
             "-batchname", final_name,
             "-jobpath", jobpath,
             "-settingpath", settings.composer_config,
             "-locationpath", outfile
        ],
    });
    task.addCommand(command);

    print(`Creating output video for ${settings.format}`);
    return task;
}
So, in addition to the regular “Simple Blender Render” script, the script above also takes an input field for where to find the Compressor configuration file. This file is what sets the various output settings to create ProRes-4444 using Apple Compressor – they’re pretty simple to create in Compressor but you have to have them saved as a “compressorsetting” file for the command line invocation of Compressor to work.
TODO: I could probably also make the script pick up the Compressor app location from the flamenco-manager.yaml “two-way-variable” system. But Compressor is always going to be in /Applications for me – unlike Blender where different versions of the app might be put into different locations and where the two-way-variable system is a good way of managing that.
A key point about this script is that I use the “compressor” action type to execute the Compressor app. Essentially running it as though from a command line. I then use the flamenco-worker.yaml files, sitting alongside the flamenco-worker to limit which machines can run “compressor” tasks – i.e. limiting them to only Macs.
Here’s a sample “compressor” flamenco-worker.yaml
manager_url: http://<manager_ip_addr>:8080/
task_types: [blender, ffmpeg, file-management, misc, compressor]
restart_exit_code: 47
worker_name: <WorkerName>

# Optional advanced option, available on Linux only:
#oom_score_adjust: 500
Note how this .yaml file includes the Compressor task type which means it runs Compressor at the end of the render job. On non-Macs, this compressor task is missing.
I make sure the Macs I allow to run Compressor are not on WiFi – WiFi is fine to access my NAS for a typical render task (the file read/write over Wifi time is much less than the render time, so doesn’t significantly increase the overall job time). But seeing as the Compressor task needs to read all the large PNG files and then write essentially the same amount of data back (ProRes4444 is essentially uncompressed) then this time could be large. Better to make sure the Compressor workers are on my Gigabit Ethernet.
There is probably a way of using the ffmpeg task type instead of exec, but I didn’t try that, and there’s only so many hours in the day!
General Manager/Worker Setup
Each of the Manager/Worker nodes is configured with a static IP address (ipv4). It’s not that a dynamic address changes very often but it’s just one less moving part when you have a network of a half-a-dozen devices to work with. It also meant I could set up IP addresses that I stood a reasonable chance of remembering, rather than .23, .206, .156 etc etc. Ideally I’d go and set it all up on my router and do the static mapping there along with some sensible .local DNS, but IIABTDFI (if it ain’t broke then don’t fix it).
I run tmux on the manager and workers. That allows me to ssh into each of them and “tmux attach” to the process that running the manager/worker. This workflow saves me having endless desktop’s open in either VNC or Apple Remote Desktop (I love Apple Remote Desktop). I find that having a terminal app (iTerm 2 of course) open with multiple tabs is much easier to work with than lots of desktops. It’s also much less stressful on the network if there’s lots of render files flying around.
Manager Setup
My Flamenco manager is a fairly vanilla 2014 27″ iMac. This machine isn’t any good at doing any rendering these days, but it can easily run as a Manager.
TBH any of the other workers could be a combined manger/worker, but it sort of helps my brain to have some physical isolation of the tasks and so that’s what I did. It also means I’m unlikely to accidentally kill the manager process because I’m less likely to be logged onto it sat in the corner of my office.
The manager is connected to my NAS via gigabit ethernet and is configured for Desktop Sharing and SSH.
If I get some time to tinker with the manager setup, then I’d probably switch it over to running on a Raspberry Pi. That would take up much less power and space in my office and be perfectly capable or doing the job. But it would need the Flamenco manager to be rebuilt for ARM64 on Pi… I’ve built the project for MacOS, so it’s perfectly do-able, but not top of the list of things to do ¯\_(ツ)_/¯
Worker Setup
I have two types of Worker on my farm – Macs and Ubuntu x86 machines.The workhorse of the farm is a 28 core Intel(R) Core(TM) i7-14700K with an Nvidia 4070. This is about 50% faster than my M2 Ultra Mac Studio and 6 times faster than my M1 Max Mac Book Pro. A HP Omen Nvidia 2070 sits somewhere in the middle.
Each of the Ubuntu boxes runs an SSHd and mounts my NAS to the same mount point as it appears on the Macs (/Volumes/Flamenco) – that makes the flamenco-manager.yaml two-way-variables a piece of cake (it’s not that the two-way-vars are a big problem, its just that setting up multi-os rendering has a lot of moving parts and the mount points was just a lot easier to make as simple as possible).
I struggled to get Ubunto 24 to mount my Synology NAS nicely at first.
Both SMB (cifs) and NFS struggled to follow the symlinks that Flamenco was creating on the NAS to point toe the .blend files. In the end I went with SMB (which Linux still calls cifs) which I could find the right incantation to get working. Here’s the magic.
sudo mount -t cifs -o user=<username>,pass=<password>,rw,soft,mfsymlinks,noperm //<nas_id_addr>/Flamenco /Volumes/Flamenco
The mfsymlinks option is what fixed the symlinks problem and the noperm was my being lazy about permissions (without it I was getting the mount to be read-only, even though the user on the NAS had RW permissions). So I think the “rw” option was redundant in the end… but when there’s rendering to be done, fixing stuff that already works is not high on my priority list.
I could have set this up as an fstab entry but my render farm is a bit ephemeral and I prefer to mount the NAS as and when I need it. The whole Ubuntu, Flamenco, Blender dance seems to be very reliable, so I don’t end up having to remount the NAS very often… so no need for an fstab, IMHO.
As a Linux guy for 25 years, I feel like I should have tried harder with NFS. But also as a car-enthusiast my “don’t get it right, get it running” mentality won through!
After struggling with this for some time I now realize the Flamenco documentation details how to do the CIFS mounting. Grr! Should have read all the documentation more fully. The page is here.
Synology NAS
My NAS is now a quite old Synology DS1517+. It’s got 6 16TB drives in a RAID5 configuration. Fine for a home-office setup.
I have a specific Flamenco shared folder with just a couple of administrator accounts. So, one of the admins (!) is used to mount the NAS to the manager/workers. There’s no quota set on the Flamenco share, but with over 60TB spare on the NAS, I’m not about to run out of space anytime soon.
Apple Final Cut Pro
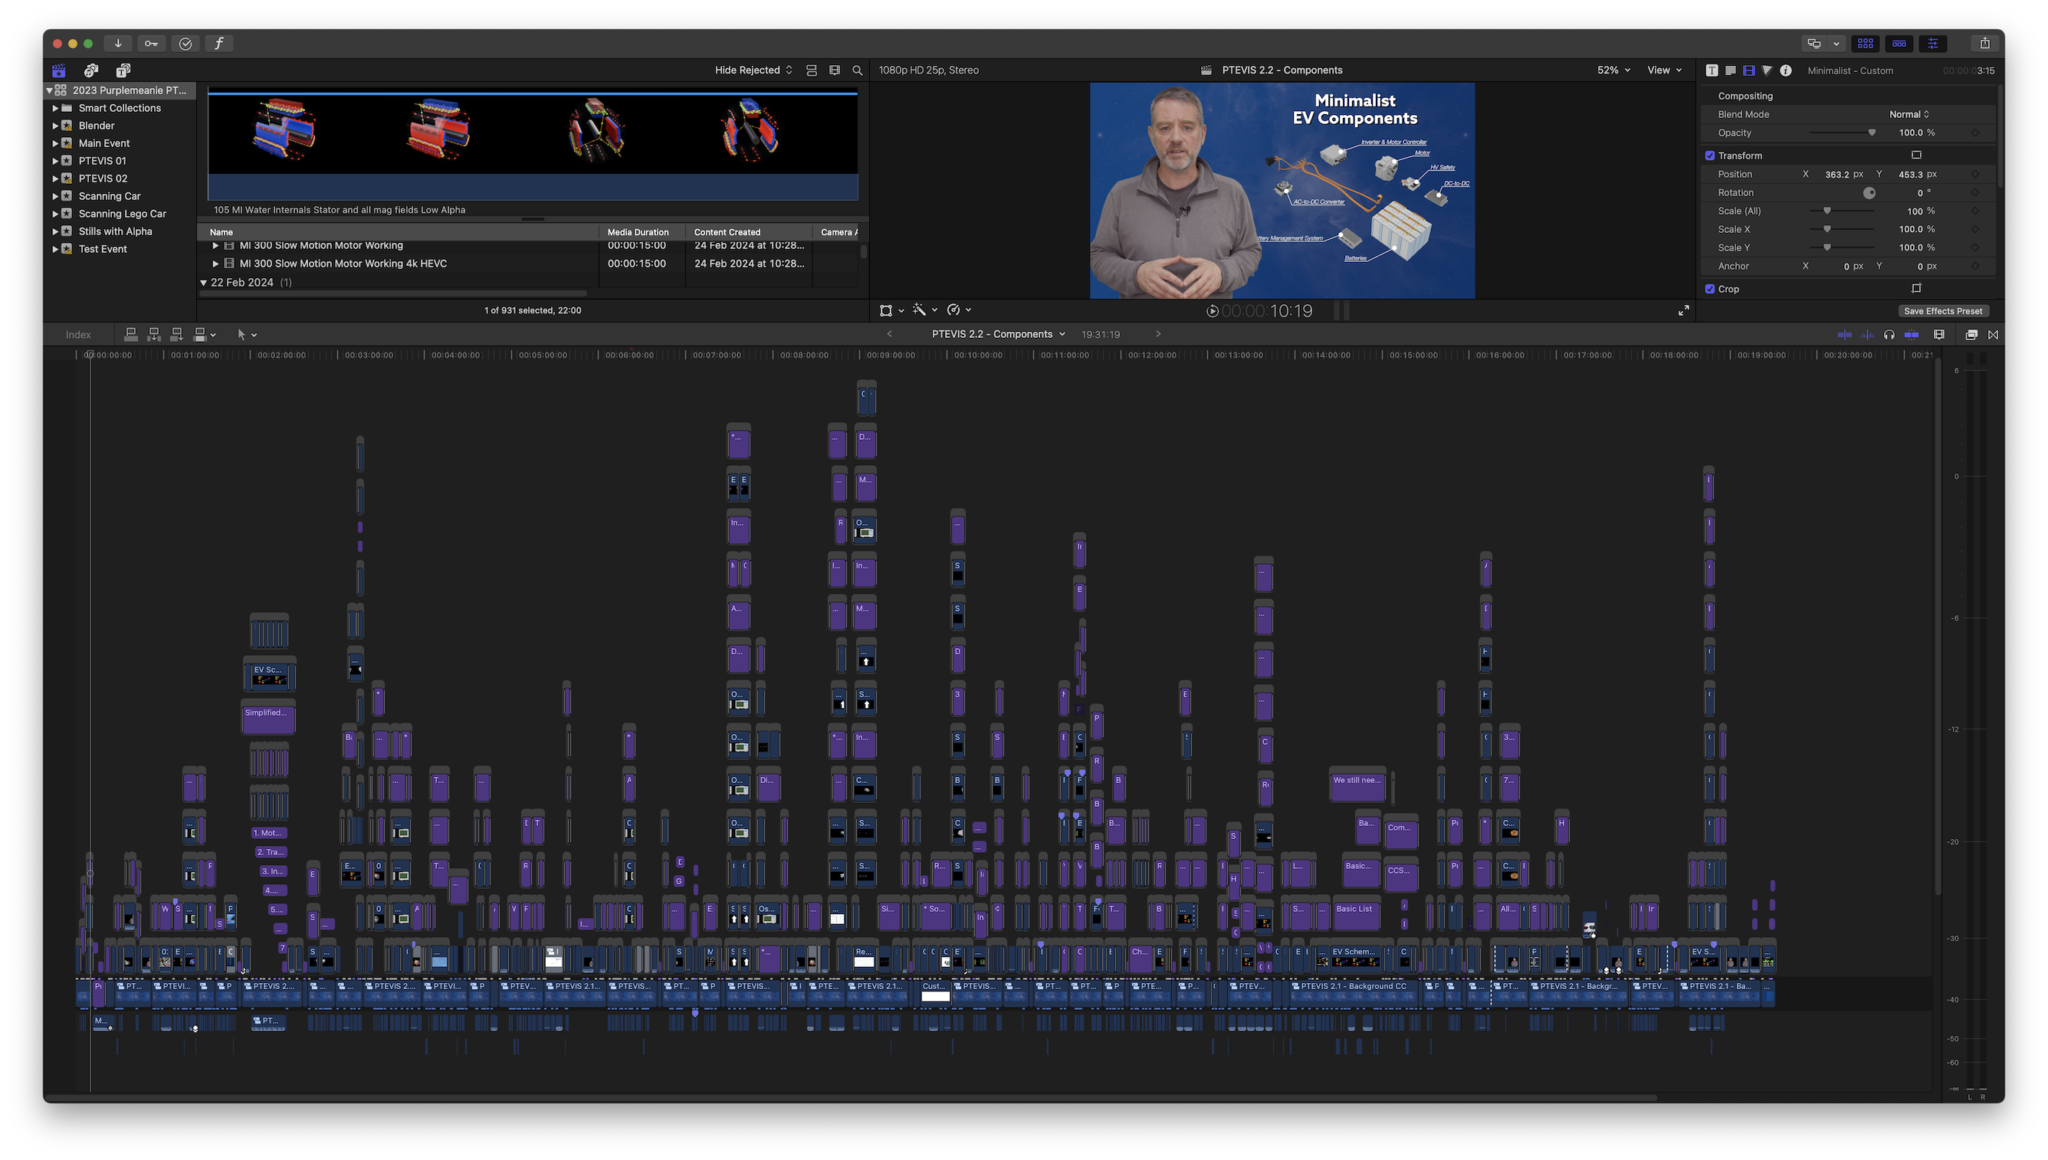
There’s not much to say about this. Except the one thing I’ve learnt about FCP is that you have to take a lot of care about changing media files behind its back. My workflow involves a lot of trial and error… which further leads to a lot of re-rendering from tweaked .blend files through Flamenco and Compressor. If the video resolution, format or number of frames changes, then FCP won’t play nicely with it after it’s initially been ingested. That’s why I spend so long getting the workflow right, because if I get half way through a FCP edit and realize my workbench proxies aren’t in the same format as my final renderings, then my edit falls apart.
But while the renderings are a massive time investment in this project, they’re not the only part of the FCP edit. I need at least a voice-over to be recorded (though ideally it would be some video a-role), there are titles to be done, call-outs, transitions, music to be added and visual effects.
The visual effects are done in Apple Motion.
Apple Motion
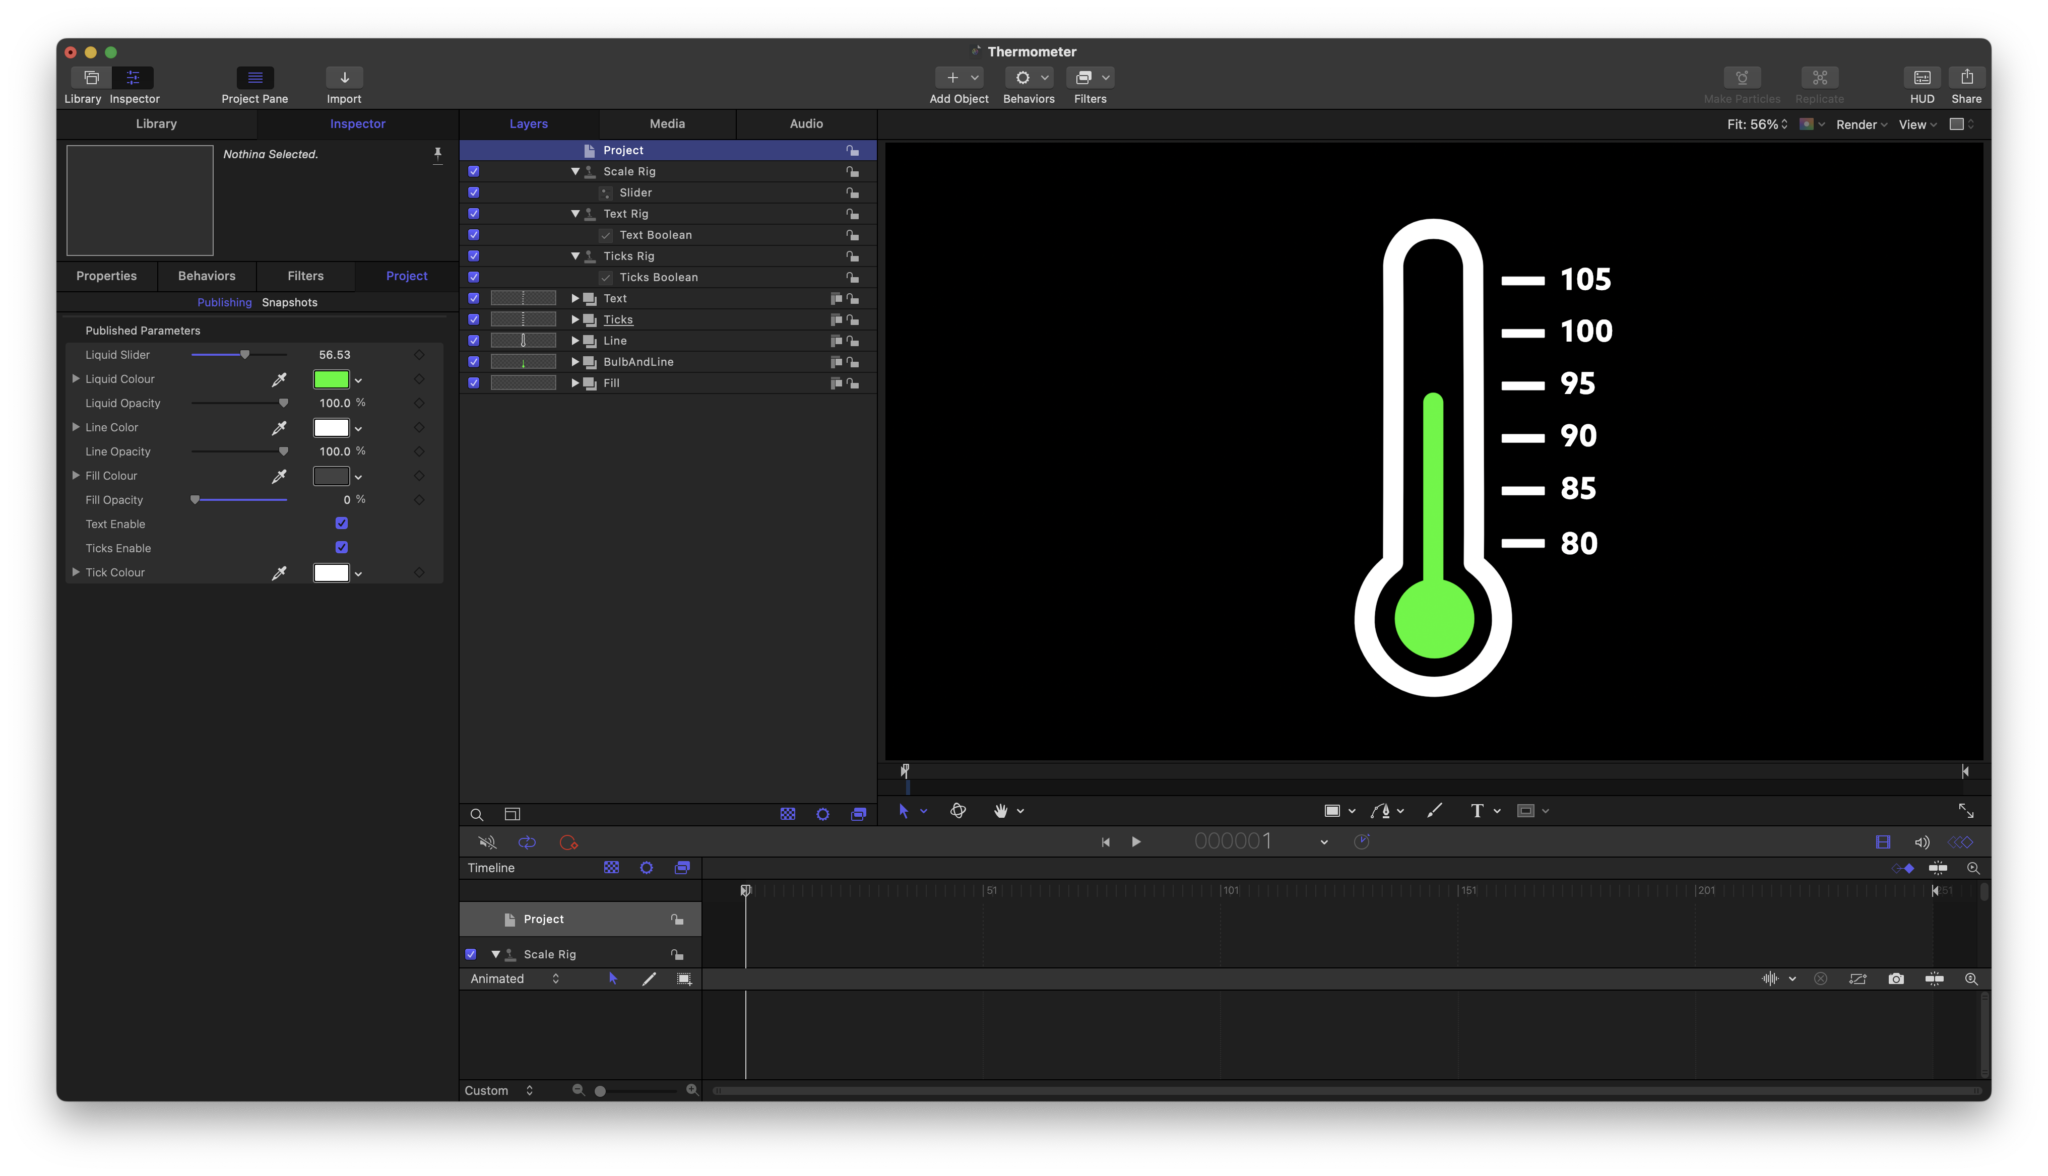
I have a love-hate relationship with Apple Motion. It does almost everything I want it to do. But I just feel it’s a bit clunky. At least it has a keyframe editor, unlike FCP.
I know there are open-source sandalists out there that would suggest I use Blender for visual effects. And in some cases I do. But for the most part the way FCP and Motion work together, at a vector level, is the much preferable way of working. Also, Motion allows a lot of flexibility on the length of effect you can render in FCP, so much better than cutting X number of frames in Blender and then pulling a video clip into FCP.
At the moment the only Motion effect I created specifically for this project was a thermometer effect…
Conclusion
So what’s the conclusion?
- Blender is AWESOME! (I contribute to the project each month, its that good)
- Flamenco is INCREDIBLE! It’s just awesome that such a powerful tool is made available for everyone to use.
- This workflow works well for even a small home setup
It was way over the top! But once I started, I couldn’t stop. Every few months I’d come back to this project, have a blast at it, realize I’d still got tons of work to do and then leave it.
But it’s nearly done now and I learnt a huge amount and really enjoyed getting my teeth into a big Blender animation project. There’s all sorts of things I’ll re-use (and have used in other animations like the motor internals from my EV series) and I learnt a lot!

Perhaps next time I’ll figure out a way of scratching a project itch in slightly less than 5 years of work!
TTFN.


Leave a Comment