
While I’ve been writing articles for the Caterham and Lost Seven Club’s Lowflying magazine, and doing a few Instagram and Facebook posts, I’ve not got around to creating the kick-off video for the Electric Seven Conversion project for Youtube, until now.
I’m not really expecting this video to set the world alight, but it’s necessary to get this video out to set the scene for any following videos. This one took about 3 weeks to get out of the door, plus all the background work to create all the 3D renders etc.
Here’s the video:
Hopefully the video stands up for itself on where I’m coming from and going to with the project. Perhaps the one thing missing in the video is a sense of timescale, which I’ll cover in another video. But for the moment I hope it will take 6 – 8 months, if I’m given a clear run at things. But other household and club projects will probably get in the way here so perhaps it’ll take longer.
I’m also going for the aphorism: Don’t get it right, get it running. The first iteration of this project will be just to get something on the road and running. It won’t be polished, and so will be the platform from which to build. By doing it this way I hope to learn about the 80% of all the issues without spending endless time and energy getting a fully polished solution – that would probably have some sort of compromise that invalidates a lot of that polish anyway.
Time will tell if that’s the right solution or not I guess.
TLDR – The Video
The video was edited in Final Cut Pro with a few home-grown Motion templates for things like the intro animations.

As you can probably tell, I used a tele-prompter to get through a script I’d written. I find that with the sort of technical content I like to do, that having a script means I don’t forget anything that I thought would be important.
I used the PromptSmart for this project. It has a really cool speech recognition system that allows you to talk at whatever speed you want and the prompter just keeps up. I’ve tried it in the past and it worked “ok” but I don’t know if they’ve updated it since I last used it or whether I’ve got my setup more dialled in, but it worked really well – only missing my speech on a couple of occasions through a recording session.
To grab the talking heads shots I needed two takes, with a lot of restarts during each take. Those two takes were then interleaved in Final Cut Pro to get the edit somewhere near passable.
Other Tech I Used
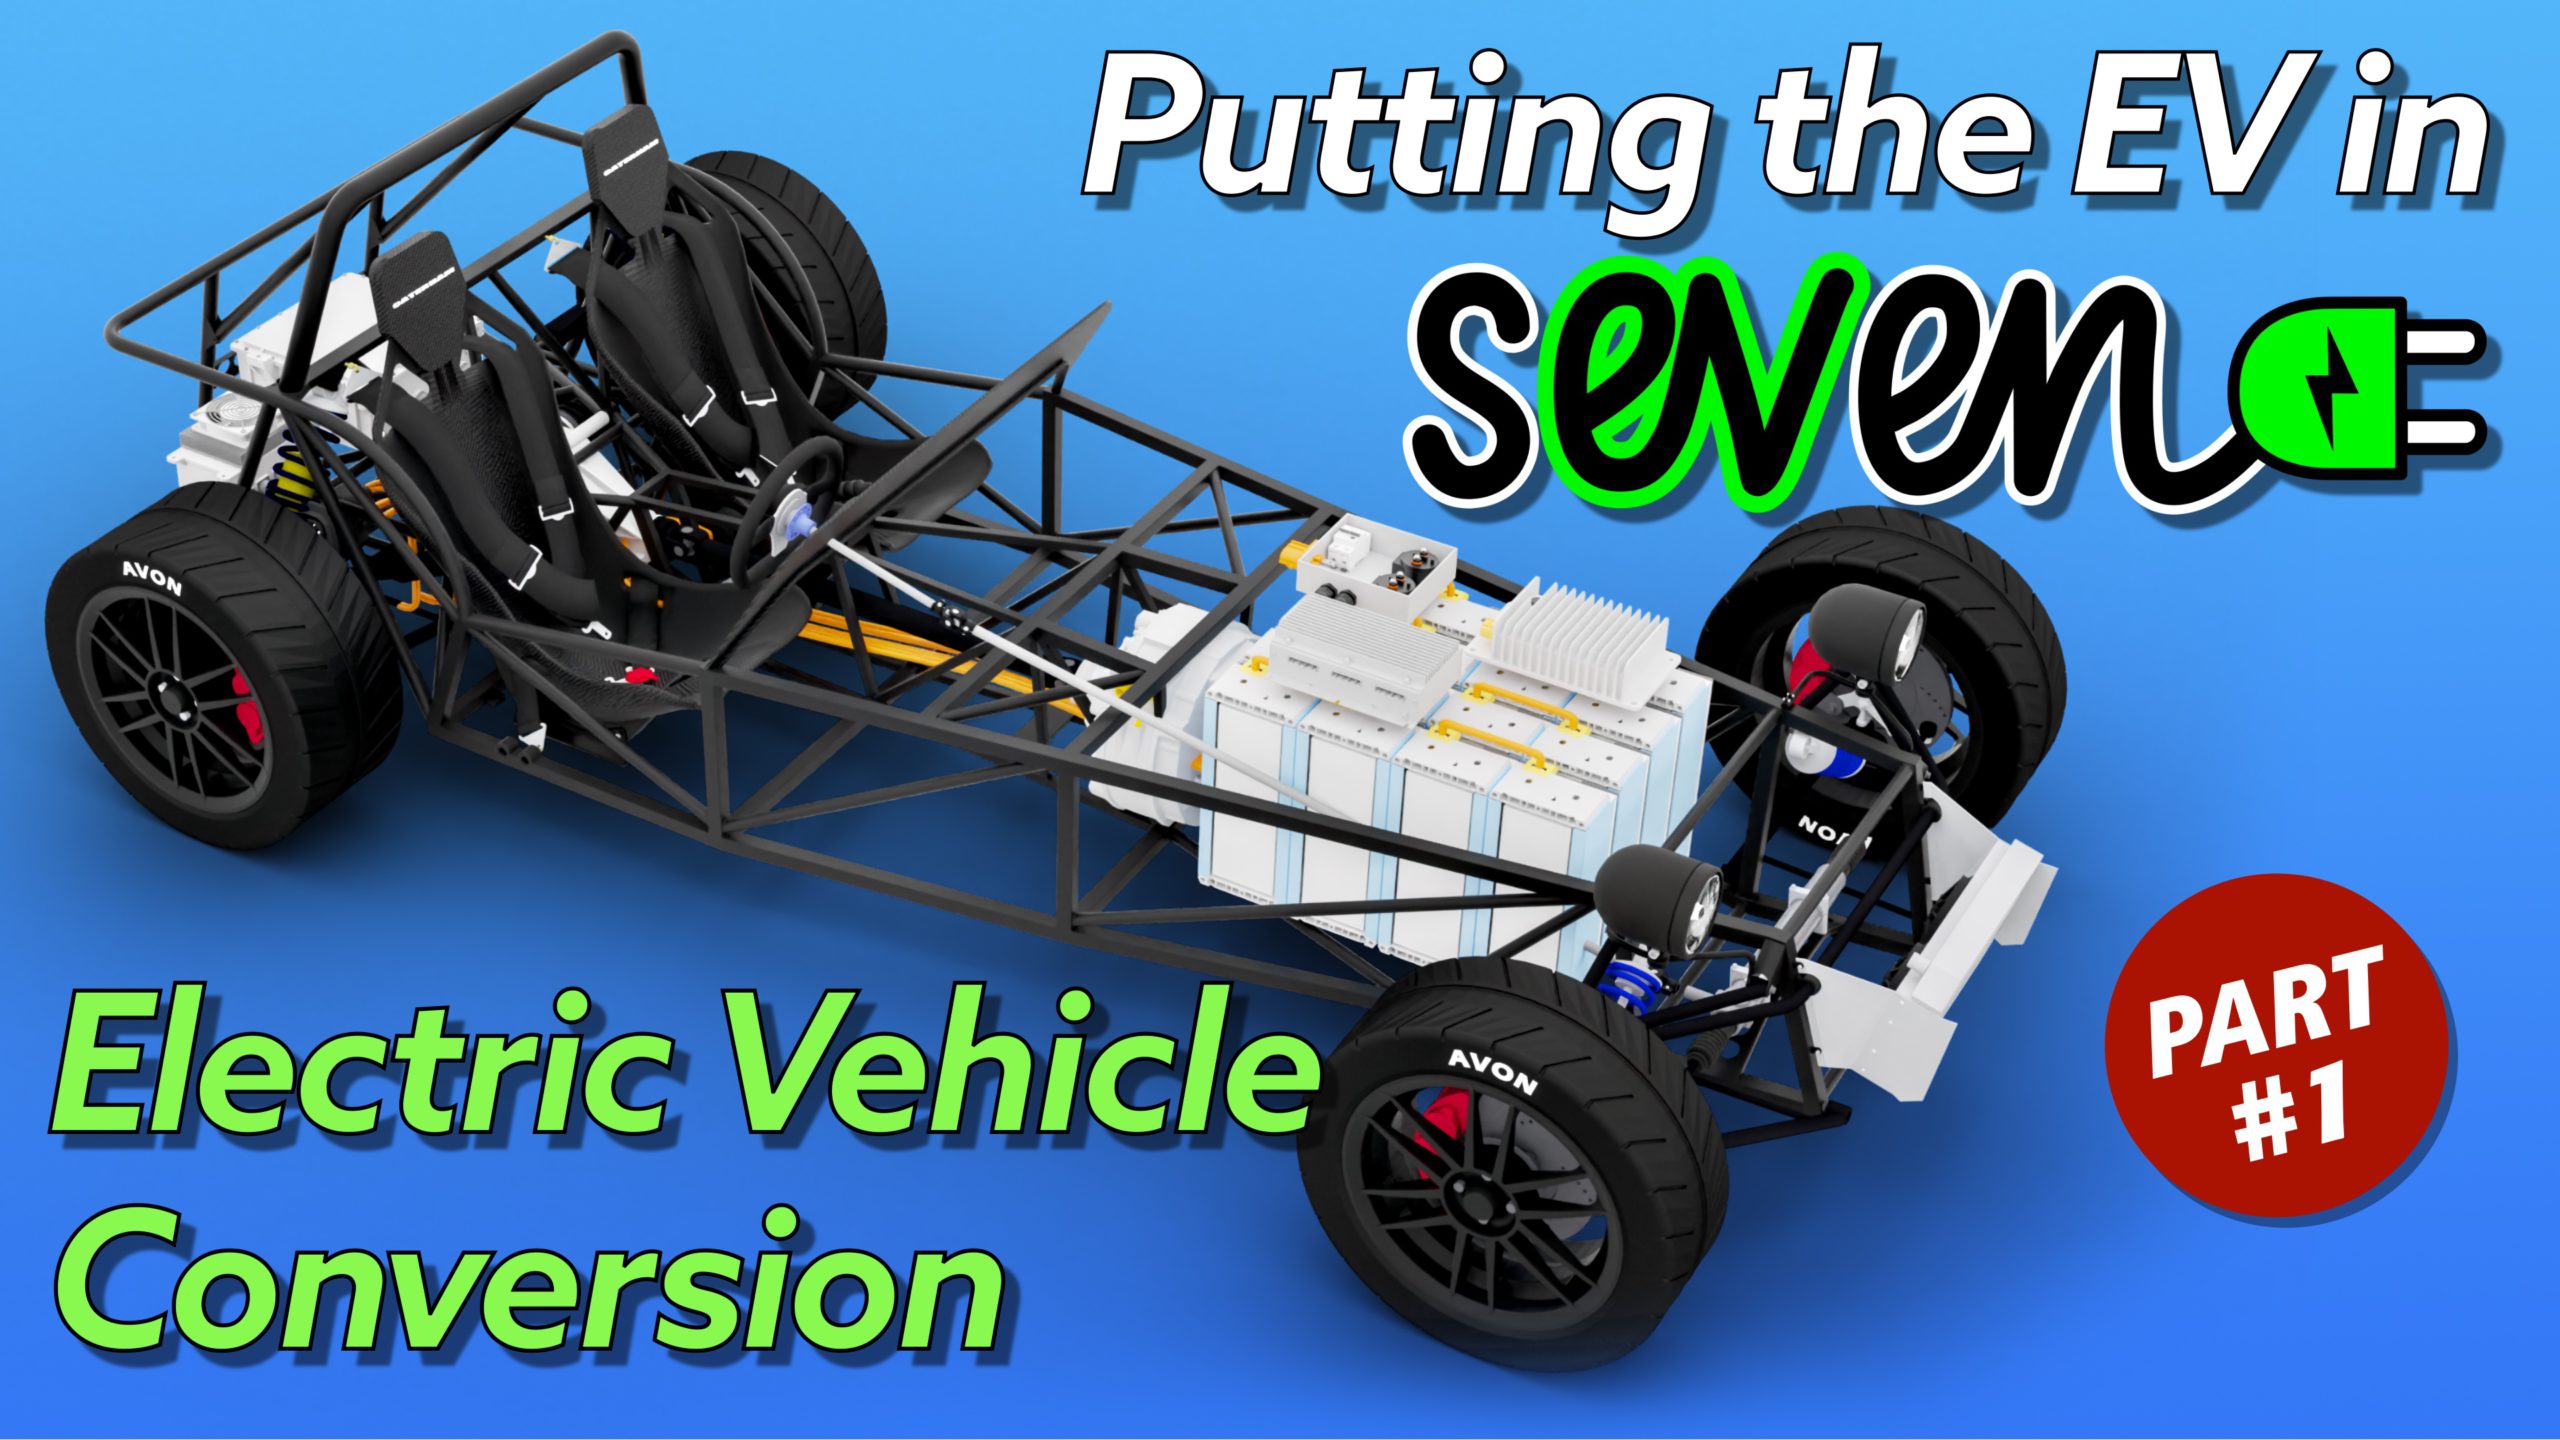
Blender (v3.5.1) for a lot of the 3D animations. The model I used for the car in Blender was a Caterham CSR model I downloaded. It’s been fairly heavily modified to get me something that’s representative of the car I’ll be using, but it gave a great insight into the packaging issues I’ll face. Most of the EV components have also been downloaded from manufacturers websites and modified so they work in Blender – that usually entails importing an STL into Fusion 360 and then exporting an .obj into Blender. Then I play around with the textures to get something that will render coloured. Ultimately, the idea is to 3D scan the project car and to use that in Fusion 360 to do my final space planning.
Another quick note about the blender clips. Some of those orbiting clips took between 6 and 8 hours to render out. They are 4k clips and rendered on a multi-Mac farm using the Flamenco render farm from the Blender Institute – awesome project! My farm contained a 2021 MBP M1 Max, 2019 iMac i9 and a 2018 i7 MBP. All with lots of memory and on a fast local ethernet. The farm wrote to a Synology NAS set up as a Mac share.
Here’s my filming setup in the garage:
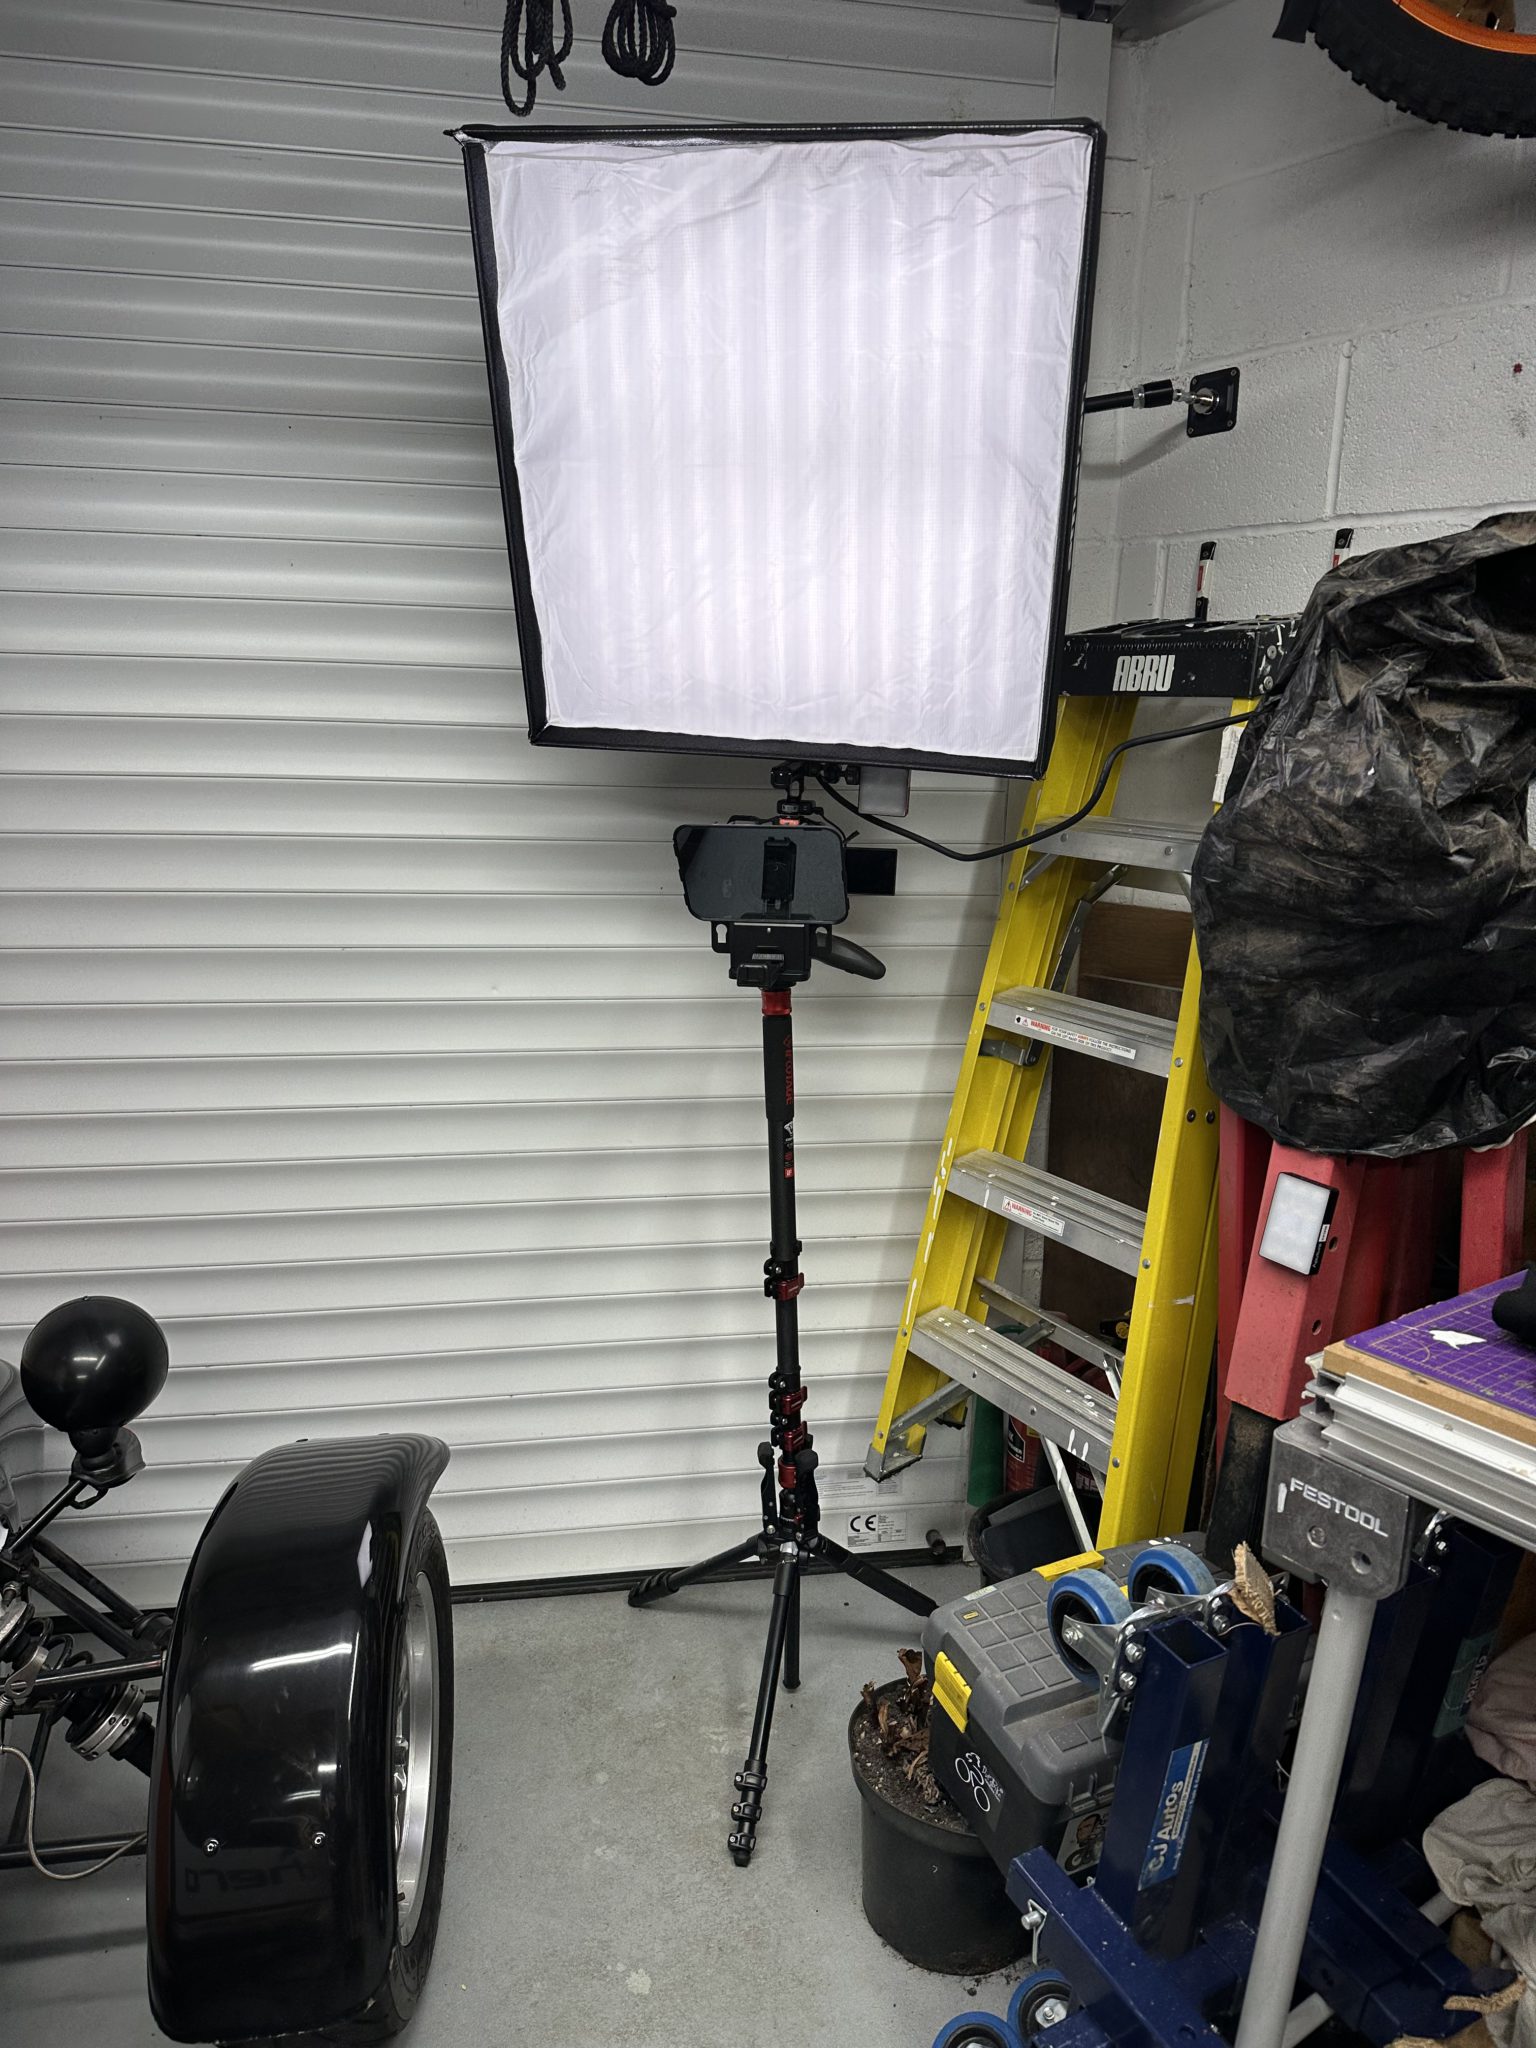
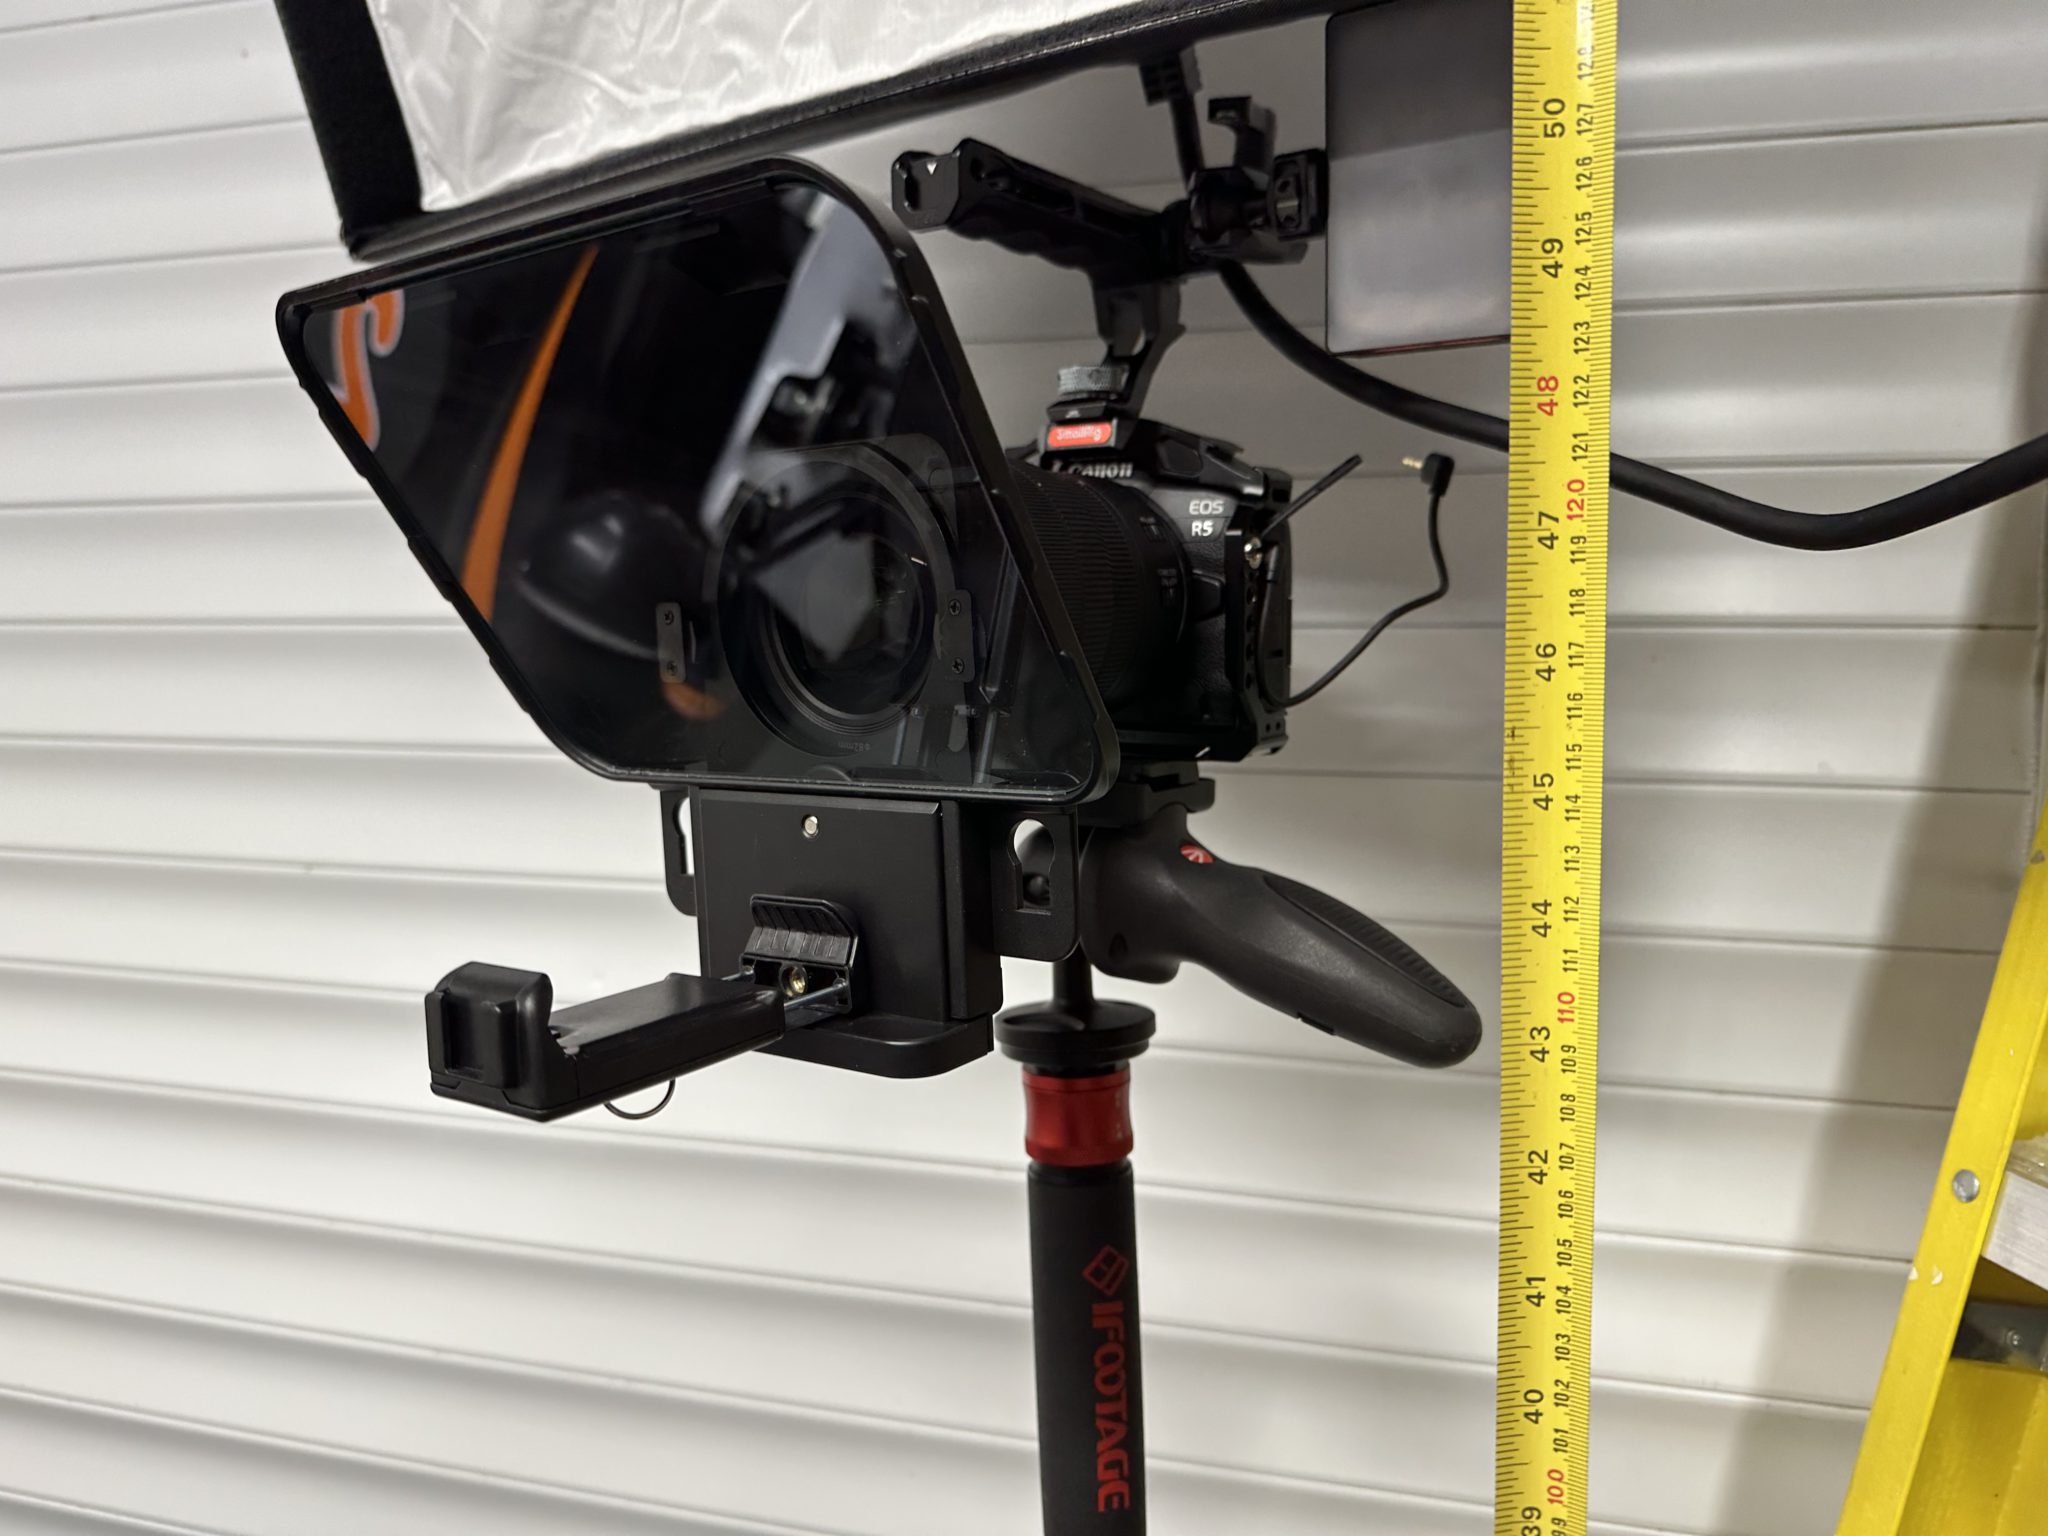
The tele-prompter hardware is a DesView3. I like this one (I’ve tried a few) mainly because it supports lenses down to about 20mm without vignetting. With a 4k recording and a wide angle then I’ve got a lot of options to punch in and re-arrange the video with just one take – no need for multi-cam recording.
One of the mistakes I made in this filming was not to use a colour chart… and to over expose me with the LED key light you see above. It made colour grading tricky and why I look so red in the final video. Hey-ho, I’ll do better next time.
Audio was done using a DJI mic setup into the Canon R5 (recording 4k, HQ in C-log3). The DJI mics are great.
That’s about all for the TLDR for the moment.
Video Chapters
- [00:00] Introduction
- [00:19] Overview
- [02:36] Why do a conversion
- [04:12] The Environment
- [04:48] Viability
- [05:24] Objectives
- [08:21] Next video
Transcript
Introduction
[00:00] It’s time for another big project. We’re converting a petrol powered, Caterham Seven, into an electric vehicle.
Overview
[00:18] So in this video, I’m going to give you an overview of our upcoming EV or electric vehicle conversion project. Where we’re taking this 10 year old Caterham Supersport SV and converting it to run on electric. Electric car conversions are nothing new, and there are a number of UK and worldwide companies offering to convert your often classic car. Into one being powered by an electric drive train. However, there aren’t many that will convert a 7 for you, and I’m not aware of any companies doing that commercially at the moment.
[00:48] I think that’s partly because, There isn’t much space in the car for a new drivetrain. But also partly I suspect. Because the petrol bit of having a 7. It’s so special So what I want to find out. Can an electric 7 also be that special? Over the coming videos, we’re going to be doing regular project updates. Along with videos on the technical and safety aspects of doing a conversion. I’ll be diving into the week. To talk about the drive train. Batteries charging, performance.
[01:17] 3D scanning the car. Safety and probably a lot more. And because of the space constraints of such a small car, I’ll be putting a lot of emphasis on 3D modeling of the design, to make sure it will fit before committing to any of the bending and welding of metal. Then we’ll put some time into talking about the trade-offs in a conversion project. Motor power versus space, battery capacity versus space and weight, gearing versus efficiency, overall layout. And a whole bunch more.
[01:46] Then there’s a very real need to talk about safety. Both what’s needed to make the conversion process as safe as possible, but also what makes a safe EV. We’ll cover working safely with high voltages, but we’ll also cover the safety systems needed in EV cars too. And because I’m not a certified instructor. I’ll also suggest. That they should only be undertaken. by someone who knows what they’re doing. And even then, that you spend a few days to get properly qualified, rather than just watching 20 minute videos of people like me on YouTube.
[02:17] And to top all those videos off, there’ll also be some Instagram and Facebook reels and YouTube shorts for people that need their dopamine hits in sub 62nd fixes. But above all, I hope this video series is fun and educational. And I’m aiming it at anyone who’s interested in how all of this works.
Why do a conversion
[02:36] So why do a conversion of a classic petrol-engined icon? I’ve been threatening to do a 7 EV conversion ever since I built my 420 in 2017. If you haven’t seen the video about that, then there’s a link up here in the corner somewhere. So, now seem like as good a time as any, to put my money where my mouth is and get cracking on a 7. See what I did there? Putting the EV in Seven, 7, get it? Well, if you have to explain a joke, then I guess it’s not funny is it?
[03:04] At Purplemeanie HQ, we’re just about electric everything, with solar PV. Battery storage. An EV car, solar hot water, and more projects like that that are in the works. We also monitor our usage closely and shift our usage pattern to early morning. With our Tesla battery and overnight car charging. We’ve had solar PV for around 20 years and battery storage for nearly five. So owning a petrol 7 has sort of grated on my soul for a while. My petrol 420 R is something.
[03:33] I’d wanted for over 35 years. I love driving it, and will absolutely keep it for as long as I’m allowed to. And while an electric 7 absolutely won’t be, the same sort of beast as my 420. Would it lose the essence of being a seven? There shouldn’t be an unfamiliar concept in the Caterham world. An 85 BHP, clamshell-wing 170 is a very different proposition to a snarling 310 BHP supercharged 620 R. They might look the same basic shape, but they get used in very different driving experiences.
[04:06] Perhaps an electric 7, just fits along the line between the 2 extremes somewhere.
The Environment
[04:11] Now, back to the eco side of the discussion that I alluded to before. Our 420 actually gets used very little in comparison to our other transport. And so until recently, I’ve assuaged my guilt, knowing it wasn’t a big part of our carbon footprint. But I’m a big fan of doing all you can for the environment. I’m all transport is inherently a carbon sink. Perhaps an electric 7 is just a little bit better than a nice one. I’m not going to kill anyone.
[04:38] This will save the planet. But maybe it can do it a bit when it comes to enjoying a day up in the car. We might even get into some videos about this topic at some point too.
Viability
[04:48] Doing an electric 7. It’s definitely about all of the issues above for sure. But it’s also about seeing if it’s viable. Are there too many compromises, or is it just too costly, given the inevitable trade-offs? Well, I’ve been doing my homework, and surprise, surprise, I think it is doable. I think the engineering and the physics stack up. I’ve created lots of 3D models to investigate the space I have to play with, and I’ve crunched the numbers to see whether. I’ll be able to meet my design goals.
[05:15] I’m not sure about the finances making sense, which I will also get to in future videos. But I think the engineering and the physics do make sense.
Objectives
[05:22] Now let’s take a look at what any good project needs, and that’s to understand the project objectives. What are our goals and what constitutes success, at least for me. What am I looking to get out of this? It needs to be a 7. Drive like a 7, look like a 7, and feel like a 7. Though of course, it may not quite sound like a seven.
[05:48] Where’s it going to be used? Town, country and track? Certainly on the road for day or multi-day trips, but also at the track if permitted. I’ll come back to that in a bit. I want to go places in this car, not just around town or on the back of a trailer. So it needs to have a range of at least 120 miles, which is about what I can manage before needing a break anyway. And that’s something we’ve found out owning an EV.
[06:12] It’s not range anxiety that determines how far we travel without a stop. It’s how full our bladders are. The ability to charge overnight at home. And in less than half an hour or so when away from home are all we need. That will let me charge at a track for multiple runs in a day. But of course, that would be very dependent on when tracks have the fast charges needed. There are plenty of jokes about dragging your own extra batteries to attract.
[06:36] Or even using a generator. But the reality is the EV track use will only take off when tracks have reasonably fast charges installed. I’d like to have something like my 420s performance. So around nought to 60 in four seconds and a top speed of around 120 miles an hour. Some might say that’s excessive, and some might ask why I’m not looking for world records. The reality is that I think this is about as much as you can get. In a wide bodied. known as an SV.
[07:04] Seven. Any 7 handles like a go-kart, and is fantastic around the twisty bits. But as an EV, an electric 7 might not work. With non-ideal front-to-back weight distribution or just too much weight. This may be the most difficult of all the objectives. But we’ll see. Affordability. Well, moving on. Those are the primary objectives, from which a bunch of other stuff like battery capacity and inverter type and size, sort of all fallout of the compromises those objectives create. I’d also like to point out Others have done electric 7s before me.
[07:40] I’m not the 1st. So that being said, this is just my project to do my electric 7. If you find that prospect interesting, then please follow along as I go through the ups and downs of this project. There’ll be no sweeping of any truths under the carpet. I’ve also written four articles about the project, already in the Caterham and Lotus Seven Club’s monthly magazine called Low Flying. And there’s even more on my blog at purplemeanie.co.uk. There’ll be lots more to come over the coming months, so make sure you subscribe and hit the bell icon to see any new videos as they come out.
[08:12] And if your thing is social media, then you can follow me on Instagram and Facebook for the bits in between the videos. See the links in the description below.
Next video
[08:20] The next video is going to be a deeper dive into what different bits and pieces you need in a conversion. Motors. Batteries. AC and DC converters. Inverters and the rest. I’ll explain it all based around my project. But I hope there’s plenty in there for anyone interested in electric vehicles. So, Stay tuned and happy blatting.

Leave a Comment