
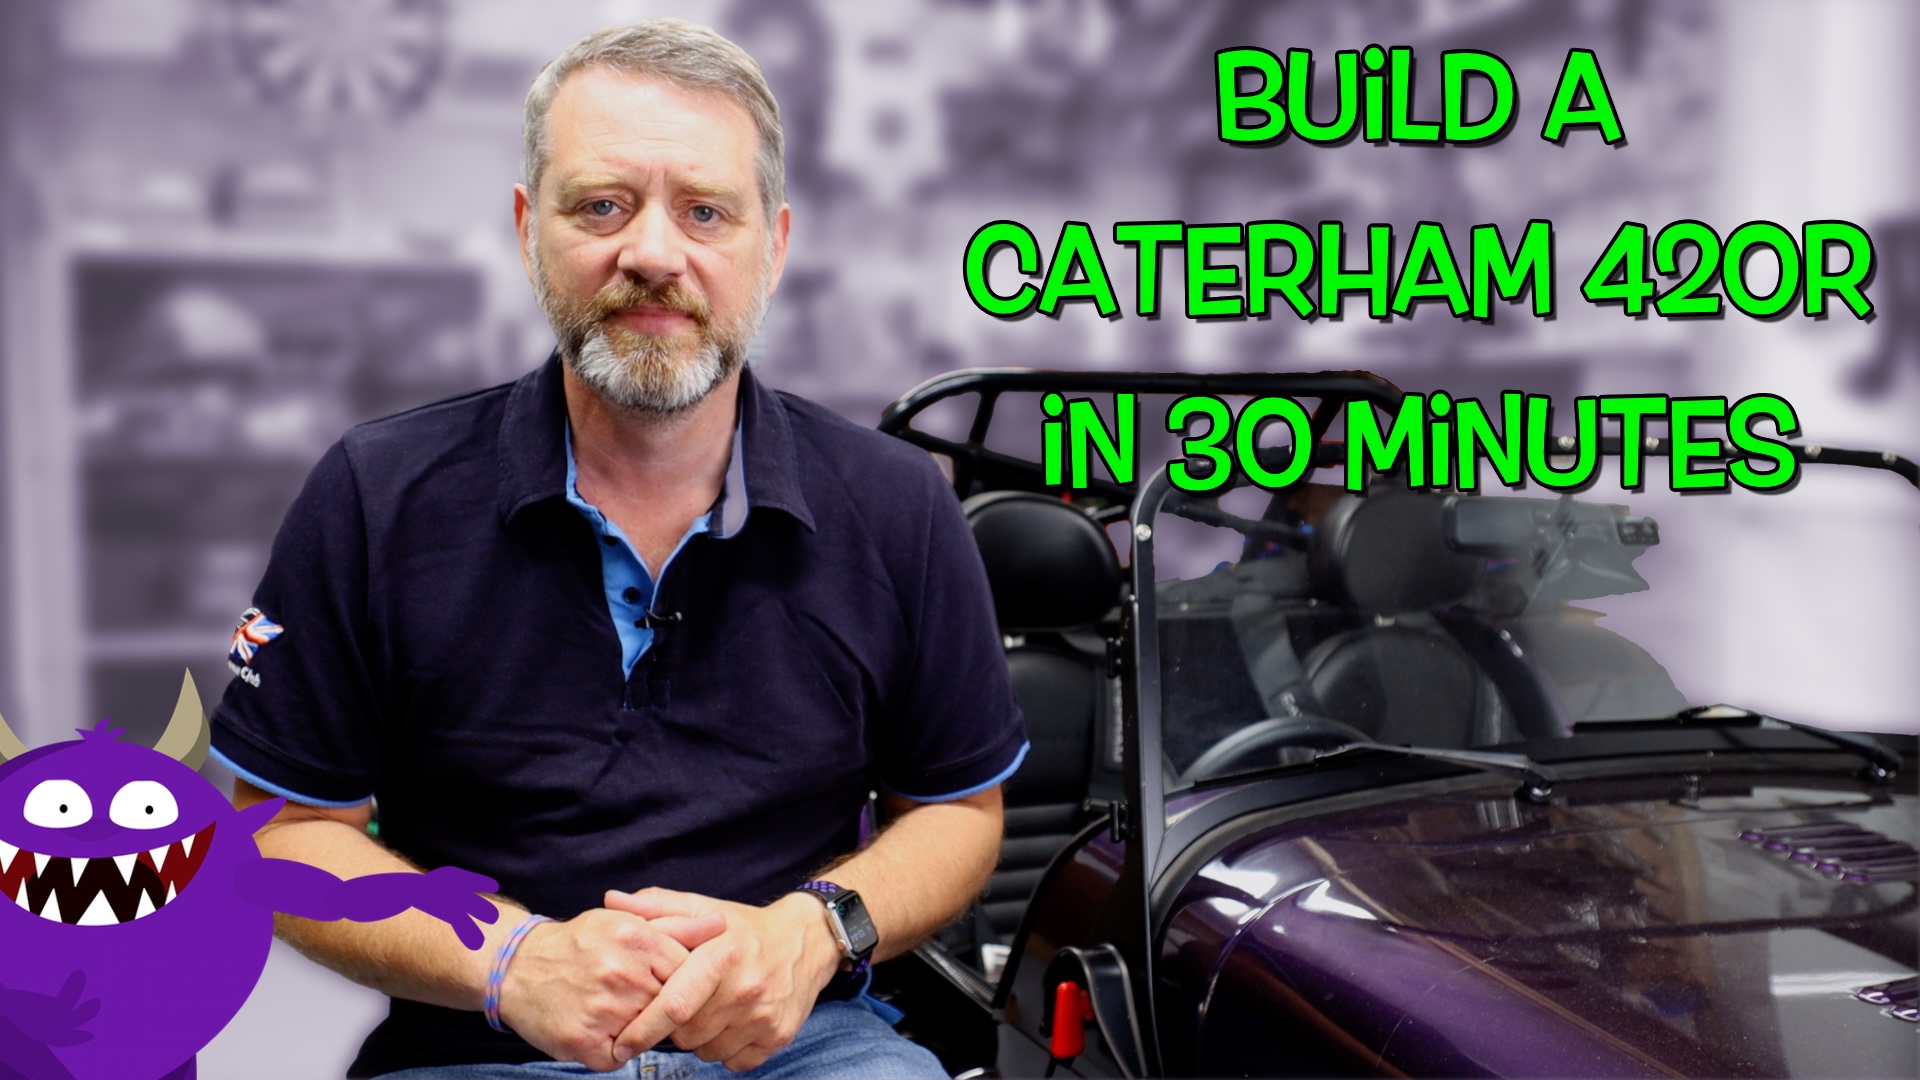
On July 11th 2020, I uploaded a bit of a longer video to YouTube documenting the build of my 420R from nearly 3 years previously.
I’d always planned to do this video, but for the usual many reasons it only got a few hours here and a few hours there since finishing the build in December 2017. But I had a week off work and with the weather being a bit crap I decided to give it a final push over the line. I have no idea how many hours it took to edit the video but its probably well over 50 and might be closer to 100… bonkers, I know! And that’s obviously ignoring the 160 hours of time spent building the car to create the time-lapse itself. It too me two days just to add captions to it!
The video is a bit rough in places, but I wanted to get something out as I hope its a useful addition to my (and others) blog. My problem with the video over the past 2 years has been that I really wanted/needed to make it twice as long as it currently is, to be able to say all I wanted to about the build. But even now at 33minutes there will be very few people that watch it, and at over an hour I could pretty much guarantee that nobody would.
Note from future self: The video went a bit viral in the end. As of Feb 2021 it’s had over 160k views. That’s 160k more views than I thought it would have when I uploaded it!
So, the video is what it is. If I was doing this video again then I’d make a better job of the audio. Both the pieces to camera and the voice over of the build itself could really do with less noise on the audio and a compressor applied to lift some of the quiet phrases. The voice over for sessions 1 to 15 had the microphone gain set too high and was hitting the limiter and I should really have re-recorded it again once I’d got to the final wording I wanted to use – the result that ended up in the video was something like 600 sections of audio cut and spliced together and took me weeks to edit down to something that sounds vaguely ok to listen to. There’s nearly 8000 words spoken in the video – no small undertaking!
And if I was setting up the GoPros at the start of the build again, then I’d make sure I took a bit more time to get a good close-up of what I was doing at each stage of the build. Certainly 3 GoPros made for a better video I think. One would not have worked for me, two would have been a minimum and four would have taken forever to edit.
I don’t quite remember now, but I think I set the GoPros to record the time-lapse with 30s intervals. I used 3 GoPro Hero 6 Blacks for the main time-lapse. They’re the first GoPros (I think) to have in-built support for time-lapse. Prior to the Hero 6 Black you had to get the cameras to save stills and then stitch them back together to make a movie afterwards.
The Video and Audio Gear
In the garage I had 3 GoPro Hero Black 6’s. They were set to time-lapse at 30s intervals. Each was set to run at the start of a session and stopped at the end. I used GoPro flexible gooseneck mounts to attach them around the garage and plugged them into mains power via USB to keep them going for up to a whole day. Each had a 64GB Sandisk memory card in them.
I also used my iPhone to take over 800 photos that became the blog, but also used it to take some video at times – the side on shot of the engine starting up is shot on iPhone for instance.
For the “to camera” section I used a Canon EOS RP and 15-28mm F2.8 lens to get the blurred background.
When recording audio I use a Zoom F6 in 32 bit mode and then either a Rode Wireless Go and lavalier microphone or a Rode NTG, also into the Zoom F6.
Editing
The video was edited in Final Cut Pro X on a selection of Macs and the whole project was about 2TB of footage and proxy media… the proxies were needed because I had to speed the video up in two stages – since FCP can’t do more than a 20x speed up in one go. So one stage was 20x and the next was 12.5x, giving a total of around 250x. With hind-sight I would have created sped up versions of the GoPro footage, exported it and re-imported it again to save the proxy space at 4k. All the video was shot in 4k to give me room to crop and zoom if I needed it. I also created multi-cam clips in FCP to be able to cut from one camera to another more easily. However, that didn’t always work and there are a couple of sections of the video that repeat but from different camera angles. If I were doing it again, then I’d pay a lot more attention to the time/date settings on the cameras to help get the clips synchronised – and probably used time-code generators… that sounds overkill but it would have saved so much time in the edit.
Like many YouTube videos, the edit got pretty complicated with all the graphics, overlays and animations. Here’s just the first 2 minutes of the edit timeline for the intro…

Anyway, as I say… it is what it is. It won’t be winning any awards, that’s for sure.
Below is the text from the YouTube description… note: when you’re in YouTube now, you can click on chapter markers to jump you to wherever you want to go in the video… my favorite bit is the trip to the IVA at the end of the video when I’m leaning out of the car to see through the rain after the wiper fuse blew as I left the house! 🙂
I hope its a useful resource and of course I’d appreciate feedback, especially if I’ve made any glaring mistakes.
And here’s the text from the YouTube description that includes the chapter minute:second timings,, but you can find that on YouTube too!
YouTube Description Text…
Almost 3 years after turning on the first GoPro to film our Caterham 420R Kit Car build, I finally got around to creating this video…
This video is a recap of the major points of our build and is in no way representative of everyone’s experience – every Caterham and every build is different!
It has taken many many hours of editing to get this video into the shape you see here. The audio is a bit janky in places and there are too many jump cuts in the pieces of me to camera… but after 3 years I decided I just had to get something published.
Hopefully it’s of some use to anyone building, or looking to build, a Caterham.
[ Bonus points for anyone who can count the number of “in the ends”, “at the end of the days” and “measure twice, cut onces” 🙂 ]
Finally, yes.. I know sessions 24 and 32 a missing – I forgot to roll the cameras for some reason. Here’s the break down minutes:seconds of each section of the video…
00:00 Intro
03:20 Arrival
04:20 Session 1: IVA Trim and Steering Rack
04:57 Session 2: Body Protection & Gearbox, Bellhousing, Engine
05:31 Session 3: Harness Tapping *
05:41 Session 4: Front Suspension
05:59 Session 5: Front Suspension & Headlights
06:35 Session 6: Headlights & Front Suspension
07:44 Session 7: Uprights
08:13 Session 8: Brake Pipes, Front ARB & Dinitrol
08:33 Session 9: Horns and Final Front ARB Fit
08:57 Session 10: Engine Mounts, L-Hose & Hoist Extensions
09:35 Session 11: Engine In
10:53 Session 12: Attempted Gearbox Shift & Electrics
11:59 Session 13: Exhaust Headers, Cat & Lambda Probe
12:49 Session 14: Steering Column & Oil Tank
13:43 Session 15: Odds & Ends, Radiator & Heater Unit
14:17 Session 16: Roll Over Bar, Engine Plumbing & Bonnet Test
14:48 Session 17: Engine Plumbing
15:43 Session 18: Prop Shaft & Differential
16:22 Session 19: Handbrake Cable, Diff Oil & De-dion Tube
17:16 Session 20: Handbrake, De-dion, Rear ARB & Radius Arms
18:03 Session 21: A-Frame, Rear Hubs, Brake Pipes & Wheels
18:55 Session 22: Knee Trim & Carpets
20:13 Session 23: Carpets & Seats
20:43 Session 25: Engine Stqrt
22:01 Session 26: Water Bleeding
22:11 Session 27: More Water Bleeding
22:39 Session 28: Boot Floor, Fuel Filler & Carpets
23:39 Session 29: Fuel Filler, Torque Rear & Rear Wings
25:11 Session 30: Washer Bottle
25:42 Session 31: Rear Brake Hose, Rear Lights & Indicators
25:58 Session 33: Front Wings, Lights, Handbrake
26:59 Session 34: Brake and Clutch Fill & Front Wings
27:54 Session 35: Front Wings, Handbrake Cable & Tidy-ups
28:26 Session 36: Repeaters, IVA Mirrors, Wipers and Rear Hubs
29:38 Session 37: Getting Ready for PBC
30:44 Post Build Check
31:25 Individual Vehicle Approval
32:41 Conclusion
Video Chapters
- [00:00] Intro
- [03:20] Arrival
- [04:20] Session 1: IVA Trim and Steering Rack
- [04:57] Session 2: Body Protection & Gearbox, Bellhousing, Engine
- [05:31] Session 3: Harness Tapping *
- [05:41] Session 4: Front Suspension
- [05:59] Session 5: Front Suspension & Headlights
- [06:35] Session 6: Headlights & Front Suspension
- [07:44] Session 7: Uprights
- [08:13] Session 8: Brake Pipes, Front ARB & Dinitrol
- [08:33] Session 9: Horns and Final Front ARB Fit
- [08:57] Session 10: Engine Mounts, L-Hose & Hoist Extensions
- [09:35] Session 11: Engine In
- [10:53] Session 12: Attempted Gearbox Shift & Electrics
- [11:59] Session 13: Exhaust Headers, Cat & Lambda Probe
- [12:49] Session 14: Steering Column & Oil Tank
- [13:43] Session 15: Odds & Ends, Radiator & Heater Unit
- [14:17] Session 16: Roll Over Bar, Engine Plumbing & Bonnet Test
- [14:48] Session 17: Engine Plumbing
- [15:43] Session 18: Prop Shaft & Differential
- [16:22] Session 19: Handbrake Cable, Diff Oil & De-dion Tube
- [17:16] Session 20: Handbrake, De-dion, Rear ARB & Radius Arms
- [18:03] Session 21: A-Frame, Rear Hubs, Brake Pipes & Wheels
- [18:55] Session 22: Knee Trim & Carpets
- [20:13] Session 23: Carpets & Seats
- [20:43] Session 25: Engine Start
- [22:01] Session 26: Water Bleeding
- [22:11] Session 27: More Water Bleeding
- [22:39] Session 28: Boot Floor, Fuel Filler & Carpets
- [23:39] Session 29: Fuel Filler, Torque Rear & Rear Wings
- [25:11] Session 30: Washer Bottle
- [25:42] Session 31: Rear Brake Hose, Rear Lights & Indicators
- [25:58] Session 33: Front Wings, Lights, Handbrake
- [26:59] Session 34: Brake and Clutch Fill & Front Wings
- [27:54] Session 35: Front Wings, Handbrake Cable & Tidy-ups
- [28:26] Session 36: Repeaters, IVA Mirrors, Wipers and Rear Hubs
- [29:38] Session 37: Getting Ready for PBC
- [30:44] Post Build Check
- [31:25] Individual Vehicle Approval
- [32:41] Conclusion
Transcript
Intro
[00:00] [ MUSIC ] Hello Everyone!… and welcome to another Purplemeanie YouTube Video In today’s video I’m going to build a kit car, a Caterham Seven 420R in about 30 minutes. [ CRICKETS ] This video isn’t going to be for everyone but for those people building, or looking to build a Caterham, I hope this will be an insight into what it takes to do a Caterham build There are lots of Caterham build time lapses on YouTube but I’m going to do something a little different, and talk you through it as well as show you the time lapse The 210bhp 420 kit that we built, sits at the top of Caterham’s line of home build options.
[00:43] They do make some more bonkers 620’s, but you can’t build them at home. The 420 has a 2 litre Ford Duratec engine, shoe-horned into the chassis of a Lotus 7 derived design, that harks back to the 1950’s. They weigh about 500 and something kilos, and so theoretically the 420 number is derived from the power to weight ratio. For a number of reasons my car isn’t anywhere close to that, weighing more like 580 or 590 kilos. But it will still do 0-60 in something like 3.8seconds and go round a track like a kart on rails.
[01:13] The Caterham kit can be built at home, or bought fully assembled from the factory. with I think about half of all UK buyers… choosing to do the build themselves. As well as the base 420R, where R means we went for the Race Pack, We also opted for some extras, including uprated brakes and 4 point harnesses. We also went for a custom, Lotus Aubergene, metallic paint option. I time lapsed the build on three GoPro’s dotted around the garage. and the video has been sped up by about 250 times…
[01:41] to get it to this 30 something minutes you’re watching. To build the car I followed Caterham’s suggested build order. using the older mostly text styled build manual. But the order is essentially the same… whether you use that or the newer… Ikea style guide that came out just after we finished our build. The recommended order is to essentially start at the front of the car… and work backwards. You then fill in with things like, trims, seats, carpets (if you ordered them)…
[02:05] and finish off with some tidy up items needed to pass… an Individual Vehicle Approval test. There’s more on the tests at the end of the video. It sounds rather simple when explained like that, but while the manuals were generally pretty good… they were sometimes vague in places, and not always up to date with what Caterham actually sent out in the kit. There were also component shortages, and some fit problems to deal with. But as they say, that’s all part of the fun.
[02:29] I like to think that I’m reasonably experienced with a spanner… but I think anyone can build a Caterham… with a reasonable amount care and determination… but above all you’ll need plenty of patience. Having said that, no matter what your experience levels… you’re going to get to know Caterham’s build support technician… who was a guy called Derek when we built our car. Thankfully, Derek had an encyclopaedic knowledge of how to build a Caterham… and was an invaluable part of getting our car completed.
[02:55] As the video plays I’ll try and explain the major bits of the process, but there’s nowhere near enough time here… to go into all the details needed… for this to be a definitive build guide. In some ways, this video is just a bit of fun… but hopefully, it sets the scene for what’s involved in building a Caterham. I’d love to hear any of your questions in the comment section below, or you can find out more on my build blog at… Purplemeanie.co.uk With all of that out of the way, lets get building…
Arrival
[03:20] So before we can start any real building, the kit has to arrive on a van from Caterham. We had 14 cardboard boxes delivered, along with the engine, gearbox, chassis, wheels, and other assorted stuff, that we took off the van and carried into the garage. Having wheeled axel stands was a great help here, and allowed us to drop the chassis onto the stands, and then roll it straight into the garage. Much easier than if we’d had to do that inside the garage.
[03:41] In the end the offload probably took about half an hour. Once we’d had a look at everything… we could see that there was much more on the chassis than we expected. Of course the body work is painted… but the chassis comes with pretty much all the electrics installed… and I was surprised to find all the poppers… for the the wet weather hood were in place… along with most of the internal panelling. Me, being me, also wanted to familiarise myself… with everything we’d had delivered, and so over the course of an afternoon…
[04:03] I pulled all of the parts out of their boxes, and took a picture to create a complete overview of the kit. The picture was a bit of stunt, but I got to see, and handle, all the parts… and inspect all the bags full of stuff… which I’m sure helped me to find things later in the build. Each bag of fixings, came with a parts sheet showing what was in the bag.
Session 1: IVA Trim and Steering Rack
[04:20] Session 1: The first task in this first real build session, was to put some masking tape on the… front body work to protect it from being dinged. Next we got to the first task… of adding short lengths of rubberised channel… to the bodywork cutouts… where the front suspension protrudes out of the engine bay. Items like this are for the car’s… Individual Vehicle Approval test. or IVA. Which is a super MOT taken at a government inspection facility, to prove that the finished car is road worthy.
[04:45] There are lots of IVA items to be added to the car. Most can be left to the end of the build, but some like these are more difficult… when the car is fully assembled. Which is why they’re done at this point. We also test fitted the steering rack.
Session 2: Body Protection & Gearbox, Bellhousing, Engine
[04:57] Session 2: Over night I’d had a bit of a rethink about our body protection and decided to add some cardboard over the top of what we’d done the day before. That seemed to do the trick and lasted all the way through the build. protecting the delicate aluminium bodywork from any damage. Next up was mating the gearbox to the engine. First of all the clutch bell housing needs to be separated from the engine. This is because the bell housing to gearbox bolts…
[05:18] have to be inserted from inside the bell housing. And are only accessible when it is removed from the engine. The bell housing is then attached to the gearbox… and the two are then re-attached to the engine together. As was often the case, we had some friends…
Session 3: Harness Tapping *
[05:30] come over to see what all the fuss was about… and then stuck around to give a hand… and of course to help us drink tea! Session three was simple… clearing debris from a harness hole.
Session 4: Front Suspension
[05:41] Session 4 was the start of the front suspension install. This is quite a big job and took a few sessions. The big problems here… are that you don’t have much room to insert the upper wishbone bolts. Also, the number of spacing washers… used between the chassis and the bottom wishbones is quite confusing. More on that in session 5.
Session 5: Front Suspension & Headlights
[06:00] Session 5 is a continuation of the front suspension… and then getting on and building up the front headlamps. As I said in the previous session… the lower wishbone washers were a problem. The side washers were a real pain in the neck… to get in between the wishbone and the chassis. But I got there in the end with lots of copper grease… some adjustable pliers to squeeze the washers into the gap… and a soft mallet to drive them fully in. The front headlamp build…
[06:21] was probably my least favourite part of the build. Getting all the protective sleeving, grommets and wiring assembled, was really tricky and I needed a couple of goes at it. I’m still not happy that the electrics will hold the test of time. as the electrical sockets just don’t give the impression that they’ll be very reliable.
Session 6: Headlights & Front Suspension
[06:36] Session 6 is more headlamp assemblies and front suspension. I spent most a Sunday on this. To assemble the headlamps I chose to use Daniel French’s excellent write-up. Daniel’s website is at CaterhamR500.co.uk Even with Danial’s guide… I managed to screw up my first attempt at a headlamp… and had to strip it all back and start again. My WD40, PTFE lubricant earns its keep here. And was one of the great purchases of the whole build. Being used in all sorts of places to ease things together.
[07:06] My problem with the headlamps… was that even laying out all the nuts and grommets in the correct order… I still managed to thread them onto the electrical cables… with one of them out of sequence. There was nothing for it but to strip off the heat shrink… disassemble the whole thing and start again. As you can see from the video… I spent a lot of time on these headlamp assemblies. Even with load of PTFE lubricant… I struggled to get the large diameter cable assemblies…
[07:28] that now included the heat shrink… down the headlamp stays. If I ever do this again… I will try and enlarge the holes in the headlamp stays… to allow the cable assemblies easier entry and exit. And finally I could start to get on with some more interesting stuff… and test fitted the offside front damper.
Session 7: Uprights
[07:44] Session 7 was all about getting the front hubs installed. This is where the 2 in 1 folding creeper… really came in handy. Allowing me to take the strain off my back… and scooch around the garage. Later on in the build… it was great at scorching around under the car as well. I found a lump of wood under the bottom wishbone… kept the suspension from sagging… and parallel to the ground as I tightened up al the nuts. Once I stepped back… I realised the the suspension geometry was google eyed…
[08:08] we’d read the manual wrong… and had to disassemble the track-rod-end and set them up correctly for a second time.
Session 8: Brake Pipes, Front ARB & Dinitrol
[08:13] Session 8 was the front brake pipes, the front anti-roll-bar… and some Dinitrol weather protection. The brake pipes looked simple… but one of them wept when I first pressurised the system. and it turned out that I’d used the wrong calliper couplings… they needed to be the grey ones, not the bronze coloured ones. The grey ones seemed to be for the standard brakes… but I have the uprated ones. The final job of the day, was spraying the lower engine bay…
Session 9: Horns and Final Front ARB Fit
[08:32] with Dinitrol weather protection. Session 9 was getting back to the anti-roll-bar after Derek had confirmed that the bushes… to use here were meant to be the red ones, not orange. I also found the socket on the wishbone, where the ball on the end of the ARB goes, was too tight for the ARB to be coaxed into. It seemed there was too much powder-coat in the socket. So out came the Dremmel to remove some. It will be protected with grease when fully assembled..
[08:52] so no fear of corrosion when finished. I also fitted the horn at the end of this session.
Session 10: Engine Mounts, L-Hose & Hoist Extensions
[08:57] Session 10 was all about prep for the engine to be installed. First of all there’s an L-shaped water hose… that needs to be fitted to the top of the engine. It didn’t seem obvious which one to use. Once I’d scratched my head for a bit though… it did make sense which is the right one, and it can only be one of them. Next up was prep for the engine mounts. There’s an electrical earth that connects… the nearside engine mount to the chassis…
[09:15] and some powder-coat needs to be removed… from the chassis to allow a good electrical connection. Out with the Dremmel and the multimeter, to test the connection was good. Finally today I constructed what I hoped would be a levelling aid for the engine leveller. I was worried that the engine was tilting side to side as I lifted it off the ground. and so I built a box section jig that I thought would help. Though I’m not sure it did much in the end.
Session 11: Engine In
[09:35] Session 11 was a big session. Installing the engine in the engine bay. It was one of the most enjoyable sessions, perhaps second only to firing the car up for the first time. I thought the engine install was going to be a quick job. But in the end it was a full day of prep, install and final adjustments. It took a couple of hours to get everything ready. As I was worried about the engine being twisted axially as it entered the chassis.
[09:57] In the end it turned out to be level enough. Though I’m not sure my leveller-leveller did much. As the day wound on there was no shortage of help from out neighbours. Especially from Ted next door, both over the fence and in person. And finally we could drop the engine in, very gradually. The tricky bit it to clear the gap between the bulk-head and the lower star cross members. It was all hands to the wheel at this point. With four of us keeping the hoist from tipping.
[10:22] We shifted the car instead of the hoist as the engine got lowered. As it was easier to move the car on the wheeled axle stands rather than move the engine hoist… which tended to jerk on the driveway sets as we moved it around. At the end of the day the engine was in. But I wasn’t happy that the gearbox seemed to be very close to the transmission tunnel. It felt like the movement of the gearbox, under load or over bumps… might allow it to touch the chassis and so transfer NVH to the cabin.
[10:45] I spent a good hour or so undoing and re-tightening the engine and gearbox mounts. to see if I could get it all to budge over a bit to the offside.
Session 12: Attempted Gearbox Shift & Electrics
[10:53] Session 12 was partly a crisis of confidence about the engine and gearbox position.. but we did also get time to look at some electrics. As I mentioned in the last session, I was worried that the gearbox was too close the chassis. So a helper, Jack, and I, got to trying to shift the gearbox over using any play we could find in the engine mountings. We tried this a couple of times. Slackening the bolts, giving the engine a "hoick" and tightening it all back up again.
[11:14] After a couple of hours of playing around we found there was no play in the system and in the end we had to leave it as it was. It hasn’t caused any problems in 2,000 miles of driving, so I guess its ok. We then set about connecting the gearbox electrics. Which is a little tricky as its not totally apparent which cables go where. But after some Googling and the use of a multimeter to check which was the neutral switch, we got there.
[11:35] We then connected the start motor… and found the manual didn’t quite match the wiring colours we had in our loom. But the connections seems to be obvious in the end, once we’d thought about it a bit. We also had a go at loosely connecting up the main battery leads. We got them in place, but left them to be finally tighten up later in the build. once we were confident the cable routing was going to work. I spent the rest of the session talking about the car with our road’s resident Lotus expert, Pete.
Session 13: Exhaust Headers, Cat & Lambda Probe
[11:59] Session 13 was all about the exhaust. Headers, catalytic converter and lambda sensor. The header pipes were pretty straightforward and just dropped in around the steering column. The springs that hold the catalytic converter to the exhaust headers were fun though. You need a combination of pliers and cable ties to get enough compression on the springs… before they can be gently manoeuvred into place. A quick job was to install the exhaust bobbin just in front of the offside rear wing. Once the cat springs were on, I could tighten up the header bolts.
[12:27] only to find my allen socket was too long and needed to be trimmed with a hacksaw. Fixing the lambda sensor cable across the bottom of the car was a bit fiddly. I thought I could use some small rivnuts, but I was worried about the size of the whole I needed, and so used rivnuts that were too small… and kept stripping their heads when inserting them in the holes I’d drilled. This is something I’ll have to come back to.
Session 14: Steering Column & Oil Tank
[12:50] After I’d torqued up the engine and gearbox mounts again… Session 14 was about the oil tank and steering column The steering column could have gone quicker. I messed around making sure the bosses… where the column goes through the dash, were ok, and then realised that the universal joint… at the bottom of the steering column, next to the steering rack… wouldn’t accept the retaining bolt and nut on one side. So that all needed some Dremmelling… testing, then some Smoothrite, for some anti-corrosion protection Then came the oil tank…
[13:13] I got the tank dropped into place, but getting the p-clips on that hold the bottom of the tank in place… were a real pain for me to get closed around the bottom of the chassis member. At least I had trouble with them for about an hour. Laying on my back failing to figure things out. Then I played around with some more smaller jobs in the engine bay and came back to the tank. Eventually I realised I’d missed the p-clips instructions in the manual.
[13:32] … and after I’d sent an email to Derek. All would have been fine if I’d have read the manual properly. You’d think that that was a lesson learnt. But this wasn’t the last time that RTFM would be uttered under my breath in the vein hope it would sink in.
Session 15: Odds & Ends, Radiator & Heater Unit
[13:43] Session 15 was more work on the water and oil radiators and fitting the heater unit. I’d lodged the radiator on its metallastic bobbins, that’s a great phrase that!… Before starting the cameras. That’s why it appears in the shot. And this was the third time I’d got the radiator out, only to put it back again. On the first attempt at fitting the radiator, I’d realised that the fan legs were missing. and I had to ask Derek to send some out to me.
[14:02] On the second attempt, I scratched my head for ages… Looking through the remaining kit pieces for what the manual called a "Radiator Cowling". It turns out that Caterham had recently decide not to fit the cowlings any more… but not told anyone, nor updated the manual, of course! By comparison the heater unit was no trouble at all.
Session 16: Roll Over Bar, Engine Plumbing & Bonnet Test
[14:17] Session 16 was the roll over bar and some engine plumbing. I needed some help with the roll over bar… So enlisted my youngest son Joe, while jiggling the ROB into place. I then played around with the hood hoops to see how they worked with the roll bar. Next was lots of engine bay water plumbing. Chopping the top radiator hose to length was one of those… measure five times, cut once moments. I’d been itching to test the fit of the bonnet and nose cone. And today was my chance.
[14:38] I wanted to see where the cooling water reservoir was going to sit in relation to the nose cone. And then to get its mounting plate fitted. There were no good instructions on the placing of the plate and I didn’t want to get it wrong.
Session 17: Engine Plumbing
[14:48] Session 17. After fitting the water expansion bottle in the last session. I could get on with the rest of the water plumbing. The plumbing in the engine bay was a little confusing at first. It wasn’t making sense until I realised… the thermostat for the radiator also included a bypass of the main plumbing that allows for fast engine heating on startup. The pipe for this is hidden under the air intake plenum on the engine’s right hand side. Playing at the bottom right of the screen is a 3D diagram of the whole plumbing circuit that I did for my blog.
[15:13] The process of creating the diagram really helped me understand what was going on with the whole plumbing circuit. Although it managed to distract me from the build for a few days while I mocked it up in Fusion 360 Finally… I’d seen a few ways of placing the pipes for the temperature sensor submarine And I decided to go underneath the other plumbing at the rear of the engine. However, since doing my build I’ve seen it done much better routed above. Underneath is harder to get to if there are problems…
[15:37] but above seems to put the pipes too close the bonnet. You pays your money and takes your choice.
Session 18: Prop Shaft & Differential
[15:43] Session 18 was working back from the gearbox with the prop shaft and differential install The first job was to get the prop shaft installed through the transmission tunnel. This was trickier than it sounded, at least on my car… as the flange on the end of the prop shaft fouled the walls of the transmission tunnel Next was the differential… it was heavy and bulky so I needed to enlist Joe again to help me lift it into place. I had wondered what a piece of black plastic was lying around in the kit of parts for weeks…
[16:05] Then it dawned on me one night that it was the skid plate that goes between the engine that goes ahead of the bell housing. I had no recollection of it being in the instructions But figured out where it went by looking on other blogs. It also didn’t quite line up on its mounting holes when I fitted it… So it needed to the grinded [ground] back on its top face to get it to fit
Session 19: Handbrake Cable, Diff Oil & De-dion Tube
[16:22] Session 19 was few smaller things. First off was fitting the handbrake cable and threading from the handbrake to the diff. The exact routing confused me to start with, but of course, that was because I hadn’t read the manual properly again. Next up was to fill the diff with oil. This stuff stank of bad eggs and was a relief to get it finished. I highly recommend wearing a mask at this stage. One of the more comical parts of the build was trying to tighten up the prop shaft to diff flange bolts.
[16:44] You need to brace the prop shaft with something to stop it rotating. And the something I used, a screwdriver,… got so tightly jammed, when I did up the bolts, that I had to cut it off with a Dremmel to get it free again. Finally today was getting started on the De-Dion tube build up on the bench. And the first part of that is to attach the hub carriers on to the end of the tube. The next job was to test fit the brake pipes and check their routing.
[17:05] At about this time I realised I needed a better way of holding the irregular shape of the De-Dion tube onto the bench A better way is to slot the flange into a workmate bench as I’ve seen done on other blogs now.
Session 20: Handbrake, De-dion, Rear ARB & Radius Arms
[17:16] Session 20. I realised over night that I still hadn’t got the handbrake cable routed correctly. So the first task of the day was to adjust where the tensioner sits. For some reason I thought it lay in the transmission tunnel, but it should sit in a recess on the diff. Then it was back to the brake lines on the De-Dion tube. They get riveted to the tube and you have to take a lot of care when bending the ends so they match up with where they get inserted into the rear brake callipers With that setup complete it was fairly straight forward to insert the De-Dion tube assembly in through the offside rear wheel arch My camera footage isn’t good here, but I spent the rest of the day fitting the rear anti-roll-bar and the radius arms.
[17:52] I also attached the rear flexible brake hose that connects from the De-Dion tube brake manifold to the rear bodywork. The chassis comes pre-installed with the brake lines running from the master cylinder to the rear of the car.
Session 21: A-Frame, Rear Hubs, Brake Pipes & Wheels
[18:04] Session 21. The rear A-frame was relatively simple but was little tricky to get installed by myself. It had a tendency to drop out of alignment as I was fixing either side. But once one side was in place it was simple to get the rest done. I also had to open up the bolt holes in the rear of the A-frame. and remove some power coat to allow the rear bolt to fit without resorting to a lot of force. Next up was a fun part….
[18:24] fitting the hubs, drop-links, speedo-cable, disks, callipers and connecting the brake pipes to the callipers. That was all nice chunky lumps of aluminium [and steel] with easy to fit bolts and sensible torque settings. There are lots of different bolt lengths to get right, but the manual was both good at explaining it all and above all accurate, which isn’t always the case. It helped to have a selection of different length and range torque wrenches during the build, but that’s obviously a luxury and not essential.
[18:48] Once the rear suspension assembly was in place I got my first chance to put all four wheels on the chassis… it’s starting to look like a car now.
Session 22: Knee Trim & Carpets
[18:55] Session 22. Knee trim panels and some carpets. The knee trim panels are one of the few cabin panels that haven’t been pre-fitted at the factory… and in order to fit them, the factory has also left some of the rivets missing from the other cabin panels, so you can slide the knee panels in behind them. The knee trims took way more time than they should have, the best part of a whole day. Lots of people on various blogs talk about fitting the panels and then re-drilling the new rivet holes to accommodate where the panel’s position ends up.
[19:20] I wasn’t so keen on that and wanted to see if I could actually get the panels to fit properly… but that took a lot of pain staking trial and error… nibbling bits off the trims and repeatedly fitting them to get them into the correct position. Once I was happy with the knee trims I move on to carpet fitting. Carpets are very much an optional extra on a Caterham. They tend to be fitted to touring cars, and I was going for a tourer that did occasional track days.
[19:44] The carpets have a limited ability to dampen noise in the cabin and hence their use for tourers. I started with the larger carpet sections in the cabin… so I could get acquainted with working with the material and glue before trying some of the trickier sections in the boot. The trick seems to be to do lots of test fitting before applying the adhesive. There were many areas where the carpet needed to be trimmed to get a good fit. I used spray adhesive on both the carpet and the bodywork for a permanent fixing.
[20:08] In two years and 2,000 miles I’ve not had any of the carpet come adrift.
Session 23: Carpets & Seats
[20:13] Session 23. Harnesses and seats. With the cabin carpets in place and the glue cured I could put some of the Caterham signature components in, the harnesses and seats. I wanted to track the car so needed at least the 4 point harness as well as the track day roll-over-bar. I’d also gone with the leather seats rather than the more race orientated carbon fibre bucket seats. With the driver’s seat in, I couldn’t resist my first test fit. We were going to tour with the car and we were keen for that to be as comfortable an experience as possible I’ve since found out that the bucket seats are also comfortable.
Session 25: Engine Start
[20:44] Session 25. Engine start! We filled the car with the various fluids and made a couple of trips to the petrol station to fill up the requisite 15 plus litres of fuel that’s needed to prime the system Our first attempts weren’t very successful… it takes a while to get used to disengaging the immobiliser and we thought that was our problem for a while. Then we realised that the fuel pump wasn’t priming and so started to look at that, taking the boot floor out to get at the pumps and electrics…
[21:08] But that all seemed to be ok as well. After taking a break in the evening I suddenly thought that it might be the tilt switch on the bulkhead that was causing the problem. And sure enough, after bypassing the tilt switch then engine finally fired up. THREE, TWO, ONE… [ ENGINE CRANKING… ] [ ENGINE CRANKING and FIRST MISFIRES ] [ MORE MISFIRES… ] [ FIRING ON TWO CYLINDERS ] [ THEN THREE… ] [ NOW FOUR! ]
[21:43] We left the engine running for a while to see how the various temperatures were doing All four headers were getting hot at about the same rate. And the engine sounded good. So we knew we were firing on all cylinders. But we were keeping an eye on the water temperatures and weren’t happy that the radiator thermostat didn’t seem to be opening. So we chickened out for the night and decided to have another look in the morning.
Session 26: Water Bleeding
[22:02] Session 26. Dad and I tried to decide if the water circuits were working… and in the end decided discretion was the better part of valour and we’d mull it over some more over the coming days.
Session 27: More Water Bleeding
[22:11] Session 27 was more coolant worries. The first task of the day was trying to adjust the throttle pedal position. The remainder of the day was about engine coolant temperatures. I thought the car was getting hot but the thermostat wasn’t opening. So I did the usual massaging of the coolant pipes and that didn’t seem to help And then decided that tipping the car up might do the trick. So I dropped the front and the rear of the car in turn to see if I could budge anything.
[22:34] In the end, I think there wasn’t an airlock and I was just being overly cautious about temperatures.
Session 28: Boot Floor, Fuel Filler & Carpets
[22:39] Session 28 was all in the boot. The first job was to treat the plywood boot floor. The bottom of the boot floor is exposed the elements underneath the car. I chose to go with three coats of clear wood varnish. Next up was to have a go at the fuel filler shroud that sits inside the boot. It should be a simple job, but mine didn’t fit quite right, and so I had to trim down the upper edge, so it would sit flush in the boot with its IVS trim applied.
[23:02] The boot carpets were quite tricky and needed a lot of patience. The carpet edges needed some small amounts of trimming off to get them to sit properly in the boot Once they were all dry fitting ok, it was on with the spray adhesive to the back of the carpet along with the boot walls and then apply some pressure for a few minutes. I used various wooden chocks to clamp the carpets in place as the glue cured. Surprisingly the carpets have managed to stay in place ever since.
[23:24] The one area of the boot carpets I didn’t glue in place was the boot floor. I figured it would be easier to insert and extract the boot floor if the carpet wasn’t permanently fixed. I also thought it was likely to get wet with rain or spillages. So leaving it free to be aired, without the wooden floor, would be a good plan.
Session 29: Fuel Filler, Torque Rear & Rear Wings
[23:40] Session 29 was finishing off the boot carpets, then getting the rear wings fitted. The boot carpeting was a simple job. It was then on the rear wings and took most of the day. I did the off side wing first and that took about twice as long as the near side one took later in the day. The job involves applying both stone chip guards and beading to the wings and then attaching them to the bodywork. My strategy was to first cut and hole punch both sets of beading I used a leather hole punch to make holes in the beading.
[24:06] Once the beading was sorted I turned to the wing guards that protect the rear wings from stone chips. If you’ve ever driven a Caterham you’ll know how they do their job as you drive along and hear stones ping off the guards at anything above walking speeds. I used masking tape and then place the stone guards on the wings marking the hole positions with a paint marker pen and then did the drilling This was another one of those measure twice cut once moments…
[24:26] as the wings are not only expensive but would have put me back weeks if I’d botched one up… and had to have a new ordered, resprayed and delivered. The wings also need cutouts adding where the wings drop over the radius arms. While drilling the fibre glass wings I made sure I used the best face mask I c ould get my hands on and glasses or goggles at all times. Even with all the protection and doing all the drilling in the open air my lungs still felt as though some of the fibres had got in there…
[24:50] and I’d recommend using the best protection you can for this job. I found it really difficult to figure out how to hold the rear wings… in the end I cam up with the idea of placing the wings on top of the tyres and obviously being careful not to drill through the tyres. The tyres gave the wings the grip they needed to stay relatively still as I worked on them. Then the rain came down as I was working on the wings and I had to retreat into the garage to finish the job.
Session 30: Washer Bottle
[25:11] Session 30 was adding some more fuel and getting the washer bottle installed. We’d added just enough fuel to get the car started and I used some spare time to fill up the remainder from a jerry can I had kicking around. The washer bottle gave another one of those comical moments in the build. The build manual tells you to fit the washer bottle in the engine bay, but on tracing the washer plumbing, you realise… it ends up in the boot and not in the engine bay at all. So I also had to come up with my own mounting bracket.
[25:33] One novice error I made was to miss out the non-return valve from the washer bottle. This resulted in washer fluid pouring over the windscreen when the car was finally on the road, but that was a simple fix.
Session 31: Rear Brake Hose, Rear Lights & Indicators
[25:42] Session 31 was a simple job of getting the rear light clusters installed. This was another slightly nervous task that means you have to drill more holes in the rear wings. So out with the level, masking tape and lots of measuring before doing any drilling. It’s also quite fiddly to get the brake light cabling plugs and sockets connected as you flounder around under the back of the car.
Session 33: Front Wings, Lights, Handbrake
[25:58] Session 33, front wings, lights and handbrake. One of the more nerve-racking parts of the build was getting the front cycle wings attached to their stays. But as well as just fixing them to the stays, I had another one of those measure twice cut once moments while drilling the holes in the cycle wings to accept the flasher units. I’d gone with the 15" wheels that come with the more road orientated Avon ZZS tyres which didn’t seem to leave a lot of room between them and the wing stays.
[26:20] It also seemed that the width of the tyres was the biggest problem and meant that the wings would foul the tyres unless I could space the wings off the stays some how. I also spent quite a bit of time bending the wings stays with some aluminium bar to try and get them as central as I could before bonding the wings on. Next up was getting to fixing some more lights to the car. I think I came back to the headlamps a few times as I couldn’t get the crimps around the headlamp leads to mate correctly with the sockets in the loom.
[26:44] Good electrical sockets just sort of work when you crimp them all together, and these didn’t. Though to be fair they haven’t caused too many problems since being on the road. For the rest of the session I spent a lot of my time sticking bits of masking tape to the stays and tyres to get my head around where the tolerances were and what gaps I had to play with.
Session 34: Brake and Clutch Fill & Front Wings
[26:59] Session 34 was fluids and more on the front wings. First up today was to fill the clutch system with hydraulic fluid. This went a lot better than I thought it would and I guess its helped by the fact that the braided clutch line… exits the clutch from the top meaning there’s little chance for air bubbles to be trapped. Next up was filling the brake system. Before finally adding any fluid I did a final work around all the various couplings and joints to make sure everything was nice and snug.
[27:21] then set about filling the system and then working around each corner of the car in turn. To bleed the system I went with the old school method of using some plastic piping, jam jar with some fluid in the bottom… and then opening and closing the bleed valve as I pumped either of the pedals. I also cut a length of wood that I could use as a brace against the clutch and brake pedals when depressed. The spongey pedal I got after doing this wasn’t a particular surprise.
[27:43] But the rear brakes were my main suspect when they clearly felt like there was air in the system. I think it was more about the brakes bedding in, at after the first couple of bleed sessions it was.
Session 35: Front Wings, Handbrake Cable & Tidy-ups
[27:54] Session 35. I was still spending a lot of time pondering the front wings before bonding finally them down to the stays. I was rapidly running out of jobs to do and was going to have to bite the bullet soon A job that I probably didn’t need to do was to sort out the routing for the handbrake cable. I didn’t like the routing of the handbrake cable around the left hand side of the diff. And could remove a large chunk of rib off the diff that didn’t seem to be doing anything on my car and would allow the cable to route without the casing binding on the diff.
[28:17] The rest of the session was all about tidy ups. There seemed to be endless cable ties needed to stop the cables and pipes from flapping around. And I went with the motto – you can’t have too many cable ties.
Session 36: Repeaters, IVA Mirrors, Wipers and Rear Hubs
[28:27] Session 36: Repeaters, IVA stuff, mirrors, wipers, rear hubs and front wings. This was day three of the big push. Over night I’d finally landed on my front wing approach. I put a large bead of Sikaflex on the top of each of the wing stays and would let it cure before bonding the wings on top of them. That would give me about a 1cm standoff and in the end it was crucial in getting the required enough clearance between the tyres to the wings.
[28:49] The repeater wiring was a bit fiddly to get down the wing stays… especially as I’d decided to take the earth wires back to the chassis and not ground the repeaters using the wing stays themselves. So I decided to extend the ground lines and find some good ground points inside the engine bay. The wing mirrors were also a simple job that took longer than they should. There’s a knack to getting tensioning screws tightened. Wipers were a simple job and you don’t have to be afraid of bending the arms to make the blades sweep the window as best you can.
[29:13] The rear hubs were a fun job. You need a hefty 274Nm to tighten them up to the spec and that caused problems bracing the wheels as you apply torque to the nut. In theory you can bind the prop shaft while applying the handbrake but that didn’t work for me. So I improvised with a length of oak that I drilled to fit between the wheel hubs and the ground. Some people leave this to the post build check but I had the right torque wrench and wasn’t going to be phased by something so simple.
Session 37: Getting Ready for PBC
[29:38] Session 37… the final session! Over night I’d finally bonded the front cycle wings to the wing stays. Without the cameras running unfortunately. We’d only got a few days until the Post Build Check was booked in. And it was touch and go whether the sikaflex would be cured in time… so it was now or never. The final build session was just getting to all the nitty gritty things that needed to be done for IVA. Some things had to be left off until after the PBC as some torque settings and fixings would have to be looked at during the check…
[30:05] and meant I couldn’t fit caps on some of the suspension nuts for instance. I also went around and checked all the torque settings I could, along with making sure all the nuts and bolts… had position markers painted on them so I’d know if they’d moved while the car was being transported or checked. I could also take off all the masking tape and cardboard that had been keeping the bodywork safe for the past 4 months. One of the final jobs was add the protective foam strips that sit between the nose cone and bonnet…
[30:30] and between the bonnet and the body work. After a few hundred miles on the road I’d come back to these and add much more foam to stop the various bits from chaffing. Apparently that’s a fruitless task, but you’ve gotta try. And then that was it… it was all done!
Post Build Check
[30:45] And there we go! That’s how to build a Caterham in 30 minutes. We took about 160 hours to finish the build, completing it in the December of 2017, four months after it arrived. Once the car was finished we then had to get it checked, tested, registered and then taxed and insured before we could get it get it on the road. Firstly, we had to get the car through its PBC, where the car gets inspected back at the dealership we bought the car from… Williams in our case.
[31:08] I was looking forward to the PBC as it would give me a chance to talk to someone who knew what they were doing, unlike me!… and was my first real chance to see if I’d right royally buggered things up. I arranged for it to be picked up by Williams and taken to their workshops… They didn’t find much wrong with it in the end, so the car was delivered back to me a few days later, ready for the IVA.
Individual Vehicle Approval
[31:25] The IVA, or Individual Vehicle Approval test was reasonably straight forward and was a huge relief when it passed with no particular problems… except!… As I rolled the car out of the garage on the morning of the IVA… the heavens began to open and my decision to have the car tested without the hood was looking rather suspect. Then… as I got to the end of the drive, with the first spots of rain hitting the windscreen… I realised that the windscreen wipers weren’t working!
[31:48] They’d worked the day before!… but they weren’t working now! There was nothing for it though… but to head to the test centre with no wipers while the heavens descended on me… And on the way that meant getting rather wet! [ ENGINE NOISE and other cars passing ] [ ENGINE NOISE AND INDICATORS ] [ ENGINE GOING THROUGH THE GEARS ]
[32:21] Once there, it soon became apparent that it was just the wiper fuse that had blown… and the tester was happy that I fitted a new one and the car passed with that one small change. But that was a very nerve racking couple of hours while the tester put the car through its paces. Once I got home and dried myself off I submitted all the registration forms that day and we finally got the registration docs back a few weeks later.
Conclusion
[32:41] It was a fantastic thing to have built the car, and I enjoyed almost every second of the build. and I was very pleased and proud of what we’d managed to achieve. I’m in no rush to do it again though. I’m very happy to drive the car around and on the occasional track outing. Building a Caterham was a fantastic experience, and I’d highly recommend it to anyone that’s thinking about it. We’ve had some great experiences with the car in the two years since building it.
[33:01] We’ve taken it to the track a couple of times and been on a number of car rallies and runs. There’s also a fantastic Caterham community, all having fun blasting around the world in their cars. That’s finally it! If you like this video then please Like, Subscribe and hit the Bell Icon to get updates on any new videos. Thanks for watching… Stay Safe… and Happy Blatting!

Leave a Comment